

Regular Expressions Tutorial: Getting Started [FREE]
source link: https://www.tuicool.com/articles/hit/i2maInA
Go to the source link to view the article. You can view the picture content, updated content and better typesetting reading experience. If the link is broken, please click the button below to view the snapshot at that time.
Update note : Tom Elliott updated this tutorial for Swift 4.2. James Frost wrote the original.
Regular Expression Basics
If you haven’t heard of regular expressions — also called regex — before, it’s probably worth wrapping your head around the basics before continuing with this tutorial. Fortunately, we have you covered! Check out this Introduction to Regular Expressions tutorialhere.
Implementing Regex in iOS
Now that you know the basics, it’s time to use regular expressions in an app.
Use the Download Materials button at the top or bottom of this tutorial to download the starter project. Open the iRegex starter project in Xcode and run it.
You’re going to build a diary app for your boss — a Super Villain! Everyone knows that Super Villains need to keep track of all their diabolical plans for world domination, right? There’s lots of planning to do and you, as the minion, are part of these plans — your part being to build the app for the other plans!
The UI for the app is mostly complete, but the core functionality of the app relies on regular expressions, which it doesn’t have… yet!
Your job in this tutorial is to add the required regular expressions into this app to make it shine (and hopefully avoid being thrown into a vat of molten hot magma).
Here are a few sample screen shots demonstrating the final product:

The final app will cover two common use cases with regular expressions:
- Performing text search: highlighting, as well as search and replace.
- Validating user input.
You’ll start by implementing the most straightforward use of regular expressions: text search.
Implementing Search and Replace
Here’s the basic overview of the search-and-replace functionality of the app:
-
The Search view controller,
SearchViewControllerhas a read-onlyUITextViewthat contains an excerpt from your boss’ private diary. -
The Navigation bar contains a Search button that will present
SearchOptionsViewControllermodally. - This will allow your evil boss to type information into the field and tap “Search.”
- The app will then dismiss the Search view and highlight all matches from the diary in the Text view.
-
If your boss selected the “Replace” option in
SearchOptionsViewController, the app will perform a search-and-replace function for all matches in the text, instead of highlighting the results.
Note
: Your app uses the NSAttributedString
property of UITextView to highlight the search results.
You could also implement the highlighting functionality using Text Kit. Be sure to check out the Text Kit Tutorial in Swift to find out more.
There’s also a Reading Mode button that will allow highlighting all the dates, times and splitters between each entry in the diary. For simplicity’s sake, you won’t cover every possible format of date and time strings that can appear in the text. You’ll implement this highlighting functionality at the very end of the tutorial.
Your first step to getting the search functionality to work is to turn standard strings representing regular expressions into NSRegularExpression
objects.
Open SearchOptionsViewController.swift
. SearchViewController
presents this view controller modally and allows the user to enter his or her search (and optional replace) terms, as well as specifying whether the search should be case sensitive or match only whole words.
Take a look at the SearchOptions
struct at the top of the file. SearchOptions
is a simple struct that encapsulates the user’s search options. The code passes an instance of SearchOptions
back to SearchViewController
. It would be good to be able to use this directly to construct an appropriate NSRegularExpression
. You can do this by adding a custom initializer to NSRegularExpression
with an extension.
Choose File ▸ New ▸ File… and choose Swift File . Name your file RegexHelpers.swift . Open the new file and add the following code:
extension NSRegularExpression {

  convenience init?(options: SearchOptions) throws {
    let searchString = options.searchString
    let isCaseSensitive = options.matchCase
    let isWholeWords = options.wholeWords

    let regexOption: NSRegularExpression.Options =
      isCaseSensitive ? [] : .caseInsensitive

    let pattern = isWholeWords ? "\\b\(searchString)\\b" : searchString

    try self.init(pattern: pattern, options: regexOption)
  }
}
This code adds a convenience initializer to NSRegularExpression
. It uses the various settings within the passed-in SearchOptions
instance to configure things correctly.
Things to note:
-
Whenever the user requests a case-insensitive search, the regular expression uses the
.caseInsensitiveNSRegularExpressionOptionsvalue. The default behavior ofNSRegularExpressionis to perform case-sensitive searches, but, in this case, you’re using the more user-friendly default of case-insensitive searches. -
If the user requests a whole word search, then the app wraps the regular expression pattern in the
\bcharacter class. Recall that\bis the word boundary character class, so putting\bbefore and after the search pattern will turn it into a whole word search (that is, the pattern “\bcat\b” will match only the word “cat,” but not “catch”).
If, for any reason, it’s not possible to create the NSRegularExpression
, then the initializer will fail and return nil
. Now that you have the NSRegularExpression
object, you can use it for matching text.
Open SearchViewController.swift
, find searchForText(_:replaceWith:inTextView:)
, and add the following implementation to the empty method stub:
if let beforeText = textView.text, let searchOptions = self.searchOptions {
  let range = NSRange(beforeText.startIndex..., in: beforeText)

  if let regex = try? NSRegularExpression(options: searchOptions) {
    let afterText = regex?.stringByReplacingMatches(
      in: beforeText,
      options: [],
      range: range,
      withTemplate: replacementText
    )
    textView.text = afterText
  }
}
First, this method captures the current text in the UITextView
and calculates the range of the entire string. It’s possible to apply a regular expression to just a part of your text, which is why you need to specify the range. In this case, you’re using the the entire string, which will result in the regular expression being applied to all of your text.
The real magic happens in the call to stringByReplacingMatches(in:options:range:withTemplate:)
. This method returns a new string without mutating the old string. Then the method sets the new string on the UITextView
so that the user can see the results.
Still in SearchViewController
, find highlightText(_:inTextView:)
and add the following:
// 1
let attributedText = textView.attributedText.mutableCopy() as! NSMutableAttributedString
// 2
let attributedTextRange = NSMakeRange(0, attributedText.length)
attributedText.removeAttribute(
  NSAttributedString.Key.backgroundColor,
  range: attributedTextRange)
// 3
if let searchOptions = self.searchOptions,
   let regex = try? NSRegularExpression(options: searchOptions) {
  let range = NSRange(textView.text.startIndex..., in: textView.text)
  if let matches = regex?.matches(in: textView.text, options: [], range: range) {
    // 4
    for match in matches {
      let matchRange = match.range
      attributedText.addAttribute(
        NSAttributedString.Key.backgroundColor,
        value: UIColor.yellow,
        range: matchRange
      )
    }
  }
}

// 5
textView.attributedText = (attributedText.copy() as! NSAttributedString)
Here’s a step-by-step explanation of the code above:
attributedText
NSRange
UITextView
Build and run your app. Try searching for various words and groups of words! You’ll see the search terms highlighted throughout your text, as shown in the image below:
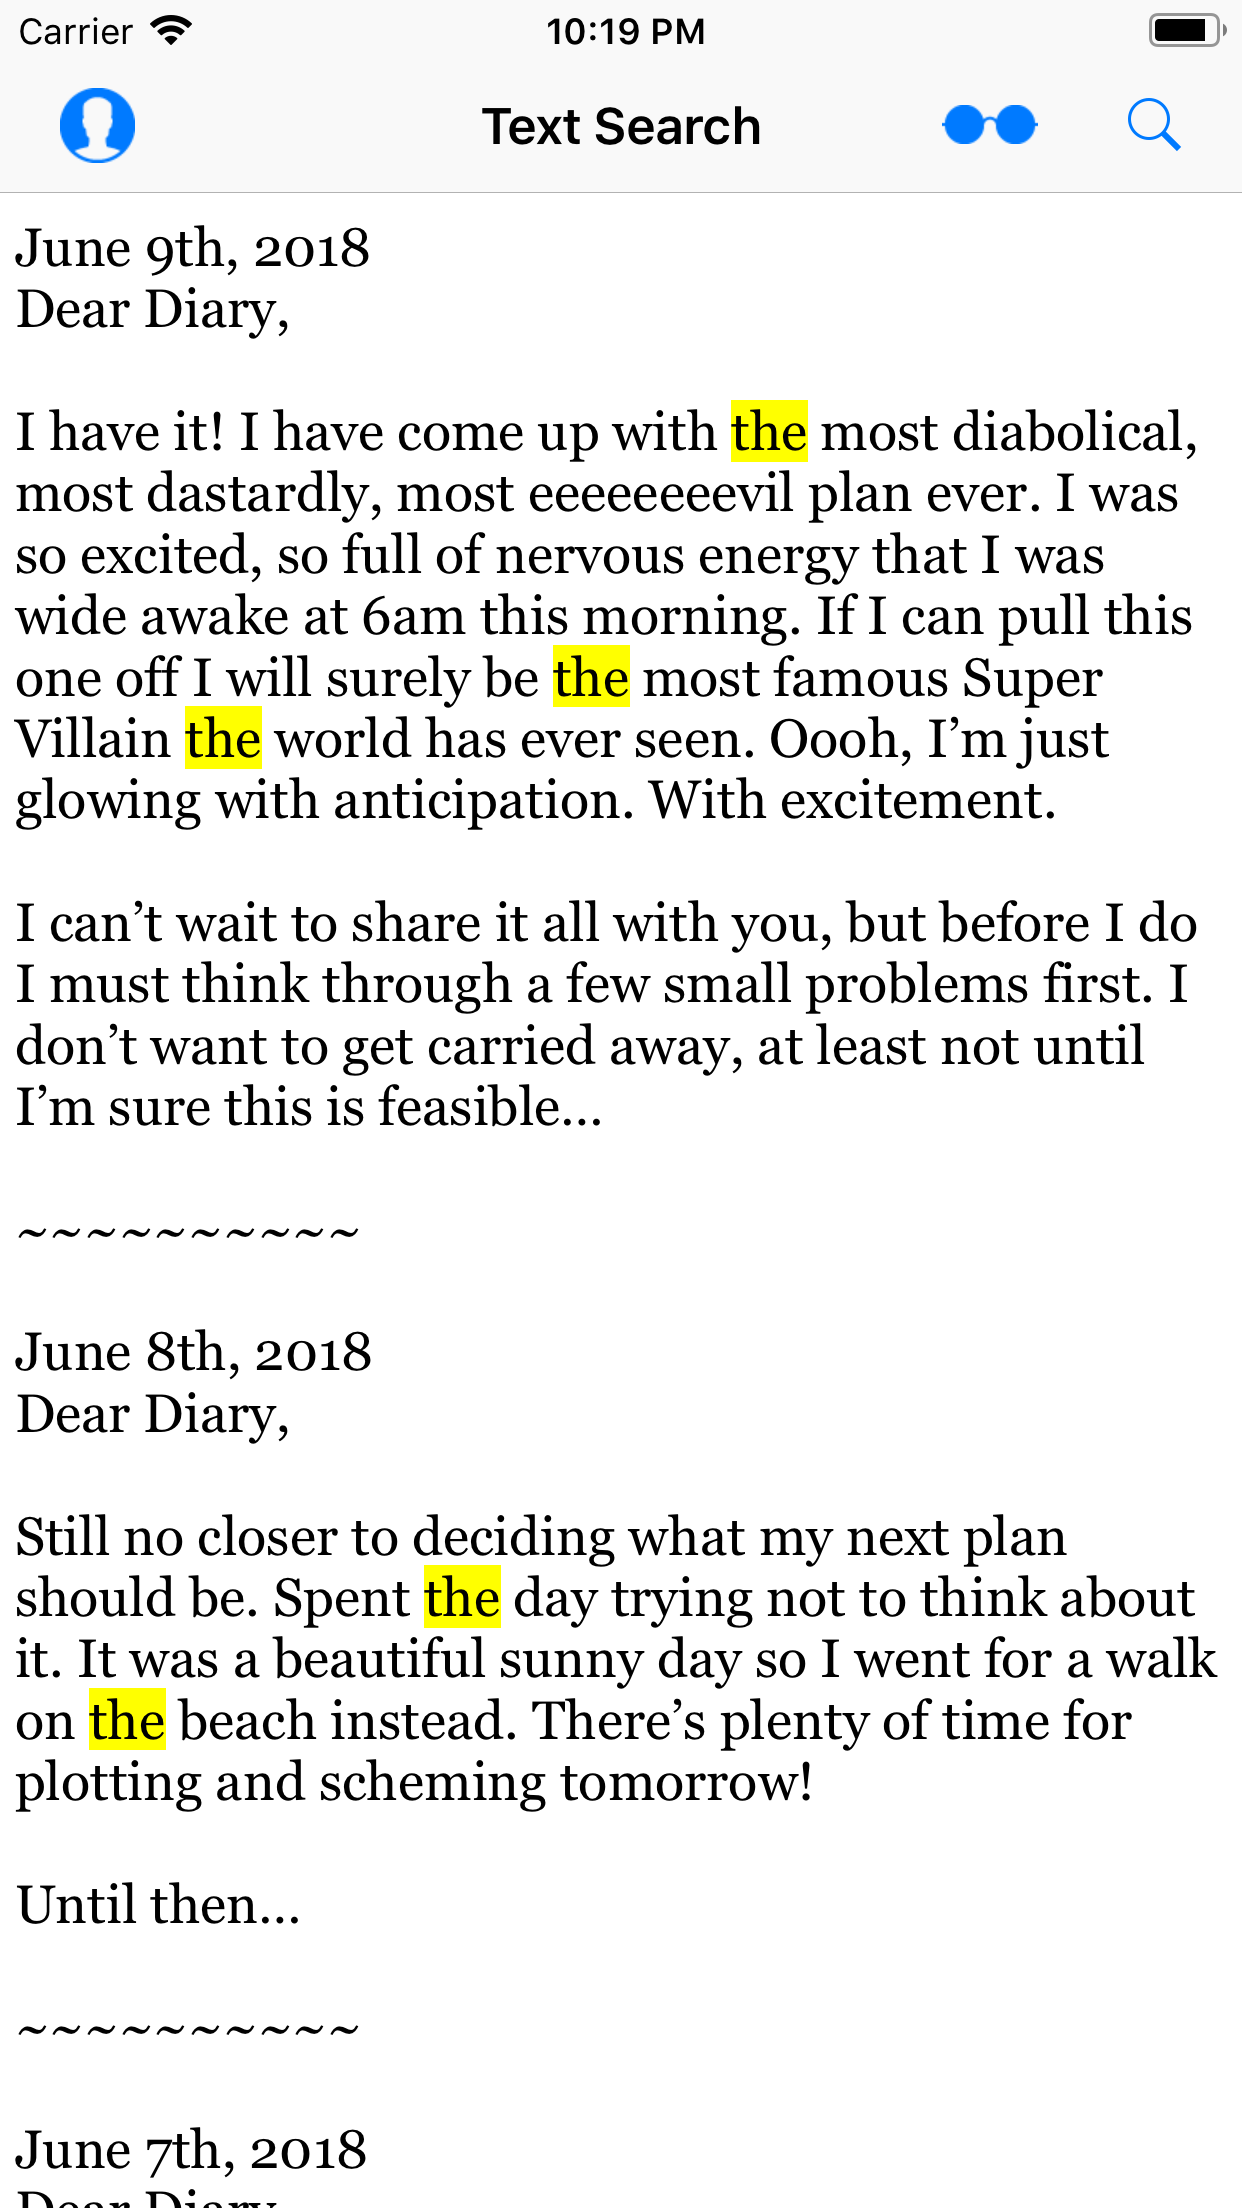
Try searching for the word “the” using various options and see the effects. Notice, for example, that, when using whole words, the ‘the’ in ‘then’ does not highlight.
Also, test out the search-and-replace functionality to see that your text strings are replaced as expected. Also try both the ‘match case’ and ‘whole words’ options.
Highlighting and replacing text are both great. But how else can you effectively use regular expressions in your apps?
Validating Data
Many apps will have some kind of user input, such as a user entering an email address or phone number. You’ll want to perform some level of data validation on this user input, both to ensure data integrity and to inform the user of any mistakes entering the data.
Regular expressions are perfect for many kinds of data validation since they are excellent at pattern matching.
There are two things you need to add to your app: the validation patterns themselves and a mechanism to validate the user’s input with those patterns.
As an exercise, try to come up with the regular expressions to validate the following text strings (don’t worry about case sensitivity):
- First name : Should consist of standard English letters and between 1 and 10 characters in length.
- Middle initial : Should consist of one single English letter.
- Last name : Should consist of standard English letters plus the apostrophe (for names such as O’Brian), the hyphen (for names such as Randell-Nash) and be between two and 20 characters in length.
- Super Villain name : Should consist of Standard English letters, plus the apostrophe, the period, the hyphen, digits and spaces, as well as between two and 20 characters in length. This allows names such as Ra’s al Ghul, Two-Face and Mr. Freeze.
- Password : Should have at least eight characters, including one uppercase character, one lowercase character, one number and one character that isn’t a letter or digit. This one is tricky!
Of course, you can use the iRegex playground in your materials folder to try out your expressions as you develop them.
How did you do with coming up with the required regular expressions? If you’re stuck, just go back to the cheat sheet at the top of this tutorial and look for the bits that will help you in the scenarios above.
The spoiler below shows the regular expressions you’ll use. But do try to figure them out yourself first and check your results before reading further!
[spoiler]
"^[a-z]{1,10}$",    // First name
  "^[a-z]$",          // Middle Initial
  "^[a-z'\\-]{2,20}$",  // Last Name
  "^[a-z0-9'.\\-\\s]{2,20}$"  // Super Villain name
  "^(?=\\P{Ll}*\\p{Ll})(?=\\P{Lu}*\\p{Lu})(?=\\P{N}*\\p{N})(?=[\\p{L}\\p{N}]*[^\\p{L}\\p{N}])[\\s\\S]{8,}$" // Password validator
[/spoiler]
Open AccountViewController.swift
and add the following code to viewDidLoad()
:
textFields = [
  firstNameField,
  middleInitialField,
  lastNameField,
  superVillianNameField,
  passwordField
]

let patterns = [ "^[a-z]{1,10}$",
                 "^[a-z]$",
                 "^[a-z'\\-]{2,20}$",
                 "^[a-z0-9'.\\-\\s]{2,20}$",
                 "^(?=\\P{Ll}*\\p{Ll})(?=\\P{Lu}*\\p{Lu})(?=\\P{N}*\\p{N})(?=[\\p{L}\\p{N}]*[^\\p{L}\\p{N}])[\\s\\S]{8,}$" ]

  regexes = patterns.map {
    do {
      let regex = try NSRegularExpression(pattern: $0, options: .caseInsensitive)
      return regex
    } catch {
      #if targetEnvironment(simulator)
      fatalError("Error initializing regular expressions. Exiting.")
      #else
      return nil
      #endif
    }
  }
This creates an array of the text fields in the view controller and an array of string patterns. It then uses Swift’s map
function to create an array of NSRegularExpression
objects, one for each pattern. If creating the regular expressions from the patterns fails, you fatalError
in the Simulator so you can catch it quickly when developing the app, but ignore in production as you don’t want your app to crash for your users!
To create the regular expression to validate the first name, you first match from the beginning of the string. Then, you match a range of characters from A-Z before finally matching the end of the string ensuring that it is between one to 10 characters in length.
The next two patterns — middle initial and last name — follow the same logic. In case of the middle initial, you don’t need to specify the length — {1}
— since ^[a-z]$
matches on one character by default. The super villain name pattern is also similar but starting to look a bit more complicated as you add in support for the special characters: apostrophe, hyphen, and period.
Note that you’re not worrying about case sensitivity, here — you’ll take care of that when instantiating the regular expression.
Now, what about that password validator? It’s important to stress that this is simply an exercise to show how regexes can be used and you really shouldn’t use this in a real-world app!
With that said, how does it actually work? First, a reminder on some regex theory:
- ( Parentheses ) define a capture group that groups together part of your regular expression.
-
When a capture group starts with
?=, this denotes that the group is to be used as a positive lookahead , matching the previous pattern only if it is followed by the pattern in the capture group. For example,A(?=B)matches an A, but only if followed by a B. Lookahead is an assertion like^or$, and doesn’t consume any characters itself. -
\p{}matches Unicode characters within a certain category, and\P{}matches Unicode characters not in a certain category. A category might be, for example, all letters (\p{L}), all lowercase letters (\p{Lu}) or numbers (\p{N}).
Using these, break down the regex itself:
-
^and$match the beginning and end of a line, as is usual. -
(?=\P{Ll}*\p{Ll})match (but doesn’t consume) any number of non-lowercase Unicode characters followed by a lowercase Unicode character, in effect matching a string with at least one lowercase character. -
(?=\P{Lu}*\p{Lu})follows a similar pattern to above, but ensures at least one uppercase character. -
(?=\P{N}*\p{N})ensures at least one digit. -
(?=[\p{L}\p{N}]*[^\p{L}\p{N}])ensures at least one character that isn’t a letter or digit by using the carat (^) to negate a pattern. -
And finally,
[\s\S]{8,}matches any character eight or more times by matching whitespace or non-whitespace characters.
Phew! Well done!
You can get very creative with regular expressions. There are other ways to solve the above problem, such as using \d
instead of [0-9]
. However, any solution is perfectly fine as long as it works!
Now that you have the patterns, you need to validate the entered text in each of the text fields.
Still in AccountViewController.swift
, find validate(string:withRegex:)
and replace the dummy implementation with the following:
let range = NSRange(string.startIndex..., in: string)
let matchRange = regex.rangeOfFirstMatch(
  in: string,
  options: .reportProgress,
  range: range
)
return matchRange.location != NSNotFound
And, directly underneath, in validateTextField(_:)
, add the following implementation:
let index = textFields.index(of: textField)
if let regex = regexes[index!] {
  if let text = textField.text?.trimmingCharacters(in: .whitespacesAndNewlines) {
    let valid = validate(string: text, withRegex: regex)

    textField.textColor = (valid) ? .trueColor : .falseColor
  }
}
This is very similar to what you did in SearchViewController.swift
. Starting off in validateTextField(_:)
, you grab the relevant regex from the regexes
array and trim any whitespace off the user’s input for the text field.
Then, in validate(string:withRegex:)
you create a range for the whole text and check for a match by testing the result of rangeOfFirstMatch(in:options:range:)
. This is probably the most efficient way to check for a match, since this call exits early when it finds the first match. However, there are other alternatives such as numberOfMatches(in:options:range:)
if you need to know the total number of matches.
Finally, in allTextFieldsAreValid()
replace the dummy implementation with:
for (index, textField) in textFields.enumerated() {
  if let regex = regexes[index] {
    if let text = textField.text?.trimmingCharacters(in: .whitespacesAndNewlines) {
      let valid = text.isEmpty || validate(string: text, withRegex: regex)

      if !valid {
        return false
      }
    }
  }
}

return true
Using the same validate(string:withRegex:)
method from above, this method simply tests if every non-empty text field is valid.
Run the project, click on the Account icon button at the top-left, and try entering some information into the sign-up form. When you complete each field, you should see its text turn green or red depending on whether or not it’s valid, as in the screen shot below:
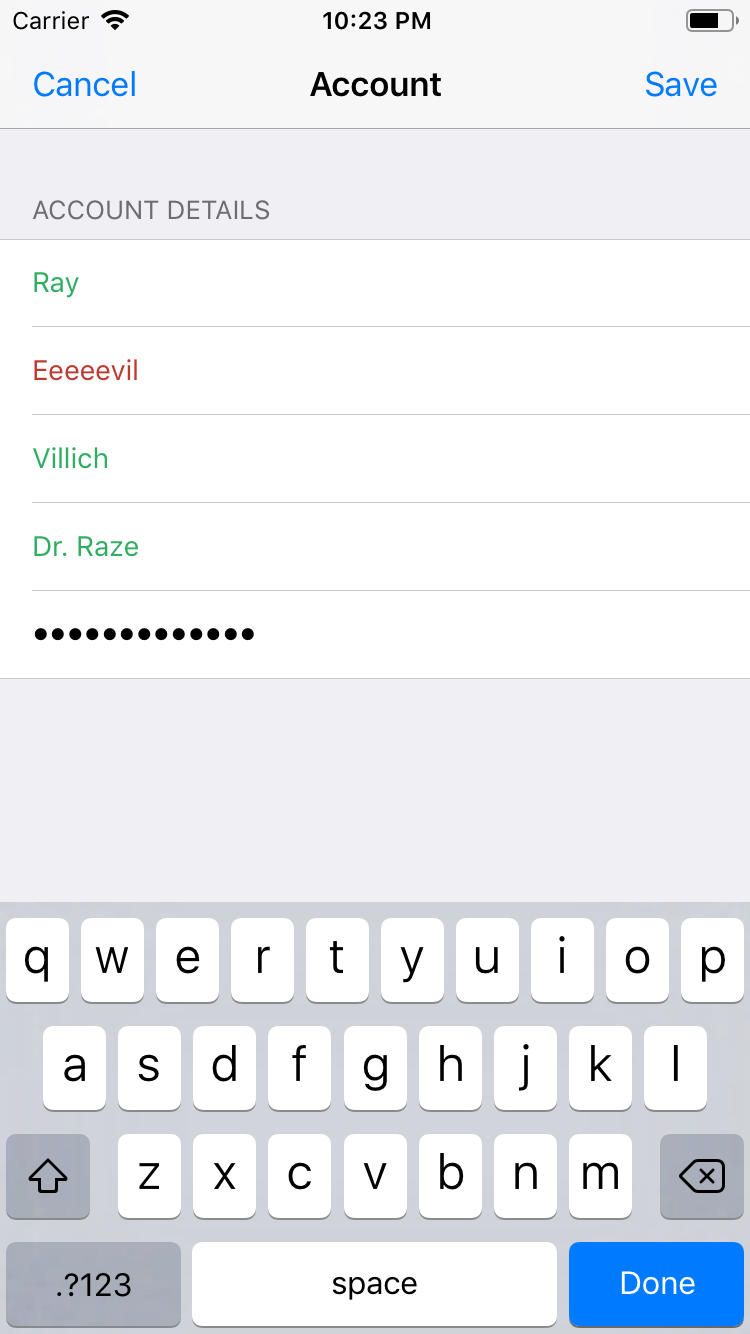
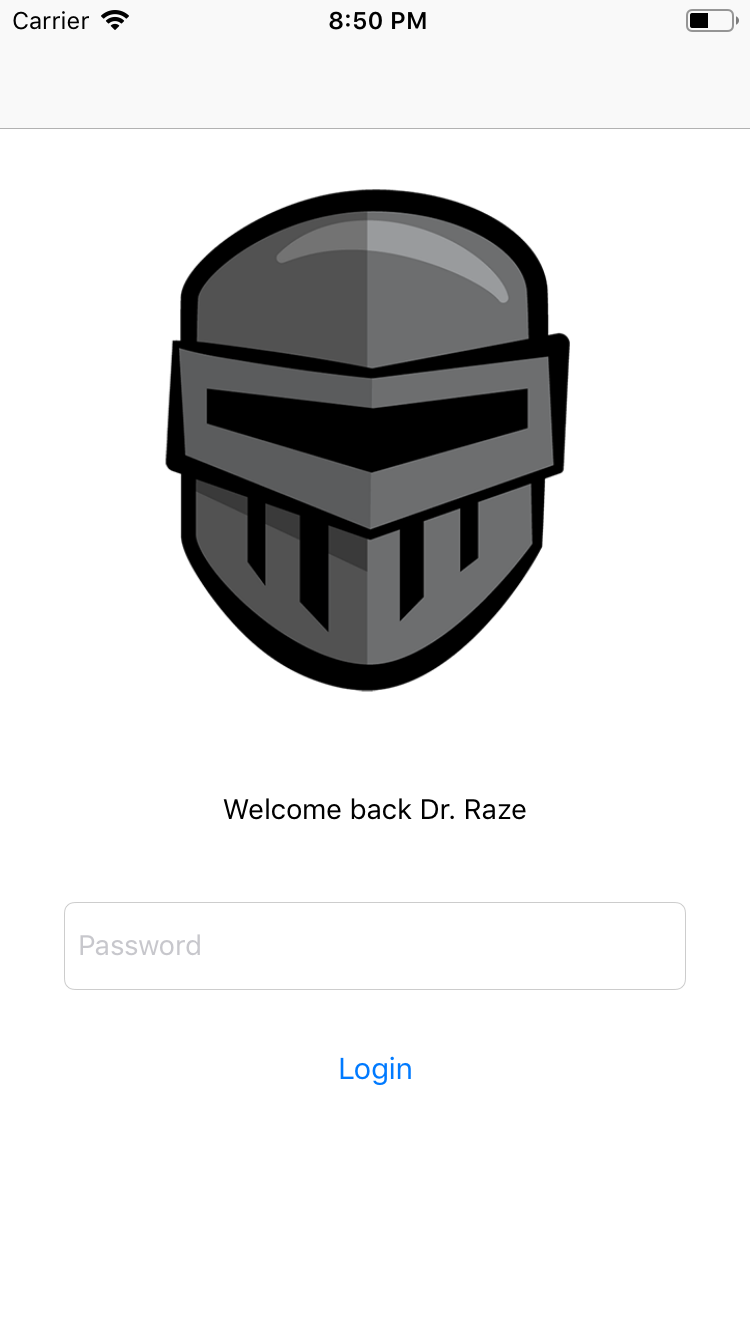
Try and save your account. Notice that you can only do this when all the text fields validate correctly. Relaunch the app. This time, when the app starts up, you are presented with a sign-up form before you can see the secret plans in the diary. Type in the password you just created and click Login.
Note
: This is a tutorial on regular expressions, not authentication! Do not use the code in this tutorial as an example of best practices for authentication. To hammer the point home, the password is stored in plain text on the device. The loginAction
in LoginViewController
only checks the password as stored on the device rather than stored securely on a server. This is not secure in any way.
Handling Multiple Search Results
You haven’t used the Reading Mode button found on the Navigation bar yet. When the user taps on it, the app should enter a ‘focused’ mode, highlighting any date or time strings in the text, as well as highlighting the end of every diary entry.
Open SearchViewController.swift in Xcode, and find the following implementation for the Reading Mode button item:
//MARK: Underline dates, times, and splitters

@IBAction func toggleReadingMode(_ sender: AnyObject) {
  if !self.readingModeEnabled {
    readingModeEnabled = true
    decorateAllDatesWith(.underlining)
    decorateAllTimesWith(.underlining)
    decorateAllSplittersWith(.underlining)
  } else {
    readingModeEnabled = false
    decorateAllDatesWith(.noDecoration)
    decorateAllTimesWith(.noDecoration)
    decorateAllSplittersWith(.noDecoration)
  }
}
The method above calls three other helper methods to decorate dates, times and diary entry splitters in the text. Each method takes a decoration option for either underlining the text or setting no decoration (removing the underlining). If you look at the implementation of each of the helper methods above, you will see they are empty!
Before you worry about implementing the decoration methods, you should define and create the NSRegularExpression
s themselves. A convenient way to do this is to create static variables on NSRegularExpression
. Switch to RegexHelpers.swift
and add the following placeholders inside the NSRegularExpression
extension:
static var regularExpressionForDates: NSRegularExpression? {
  let pattern = ""
  return try? NSRegularExpression(pattern: pattern, options: .caseInsensitive)
}

static var regularExpressionForTimes: NSRegularExpression? {
  let pattern = ""
  return try? NSRegularExpression(pattern: pattern, options: .caseInsensitive)
}

static var regularExpressionForSplitter: NSRegularExpression? {
  let pattern = ""
  return try? NSRegularExpression(pattern: pattern, options: [])
}
Now, it’s your job to complete these patterns! Here are the requirements:
Date Requirements :
- xx/xx/xx or xx.xx.xx or xx-xx-xx format. Day, month and year placement is not important since the code will just highlight them. Example: 10-05-12.
- Full or abbreviated month name (e.g., Jan or January, Feb or February, etc.), followed by a 1 or 2 digit number (e.g., x or xx). The day of the month can be ordinal (e.g., 1st, 2nd, 10th, 21st, etc.), followed by a comma as separator, and then a four-digit number (e.g., xxxx). There can be zero or more white space between the name of the month, day and year. Example: March 13th, 2001
Time Requirements :
- Find simple times like “9am” or “11 pm”: One or two digits followed by zero or more white spaces, followed by either lowercase “am” or “pm”.
Splitter Requirements :
- A sequence of tilde (~) characters at least 10 long.
You can use the playground to try these out. See if you can figure out the needed regular expressions!
Here are three sample patterns you can try. Replace the empty pattern for of regularExpressionForDates with the following:
(\\d{1,2}[-/.]\\d{1,2}[-/.]\\d{1,2})|((Jan|Feb|Mar|Apr|May|Jun|Jul|Aug|Sep|Oct|Nov|Dec)((r)?uary|(tem|o|em)?ber|ch|il|e|y|)?)\\s*(\\d{1,2}(st|nd|rd|th)?+)?[,]\\s*\\d{4}
This pattern has two parts separated by the |
(OR) character. That means that either the first part or
the second part will match.
The first part reads: (\d{1,2}[-/.]\d{1,2}[-/.]\d{1,2})
. That means two digits followed by one of -
or /
or .
followed by two digits, followed by -
or /
or .
, followed by a final two digits.
The second part starts with ((Jan|Feb|Mar|Apr|May|Jun|Jul|Aug|Sep|Oct|Nov|Dec)((r)?uary|(tem|o|em)?ber|ch|il|e|y|)?)
, which will match a full or abbreviated month name.
Next up is \\s*\\d{1,2}(st|nd|rd|th)?
, which will match zero or more spaces, followed by one or two digits, followed by an optional ordinal suffix. As an example, this will match both “1” and “1st”.
Finally, [,]\\s*\\d{4}
will match a comma followed by zero or multiple spaces followed by a four-digit number for the year.
That’s quite the intimidating regular expression! However, you can see how regular expressions are concise and pack a lot of information — and power! — into a seemingly cryptic string.
Next up are the the patterns for regularExpressionForTimes
and regularExpressionForSplitters
. Fill in the blank patterns with the following:
// Times
\\d{1,2}\\s*(pm|am)

// Splitters
~{10,}
As an exercise, see if you can explain the regular expression patterns based on the specifications above.
Finally, open SearchViewController.swift
and fill out the implementations of each decoration method in SearchViewController
as follows:
func decorateAllDatesWith(_ decoration: Decoration) {
  if let regex = NSRegularExpression.regularExpressionForDates {
    let matches = matchesForRegularExpression(regex, inTextView: textView)
    switch decoration {
    case .underlining:
      highlightMatches(matches)
    case .noDecoration:
      removeHighlightedMatches(matches)
    }
  }
}

func decorateAllTimesWith(_ decoration: Decoration) {
  if let regex = NSRegularExpression.regularExpressionForTimes {
    let matches = matchesForRegularExpression(regex, inTextView: textView)
    switch decoration {
    case .underlining:
      highlightMatches(matches)
    case .noDecoration:
      removeHighlightedMatches(matches)
    }
  }
}

func decorateAllSplittersWith(_ decoration: Decoration) {
  if let regex = NSRegularExpression.regularExpressionForSplitter {
    let matches = matchesForRegularExpression(regex, inTextView: textView)
    switch decoration  {
    case .underlining:
      highlightMatches(matches)
    case .noDecoration:
      removeHighlightedMatches(matches)
    }
  }
}
Each of these methods uses one of the static variables on NSRegularExpression
to create the appropriate regular expression. They then find matches and call highlightMatches(_:)
to color and underline each string in the text or removeHighlightedMatches(_:)
to revert the style changes. Check out their implementations if you’re interested to see how they work.
Build and run the app. Now, tap on the Reading Mode icon. You should see the link-style highlighting for dates, times and splitters, as shown below:
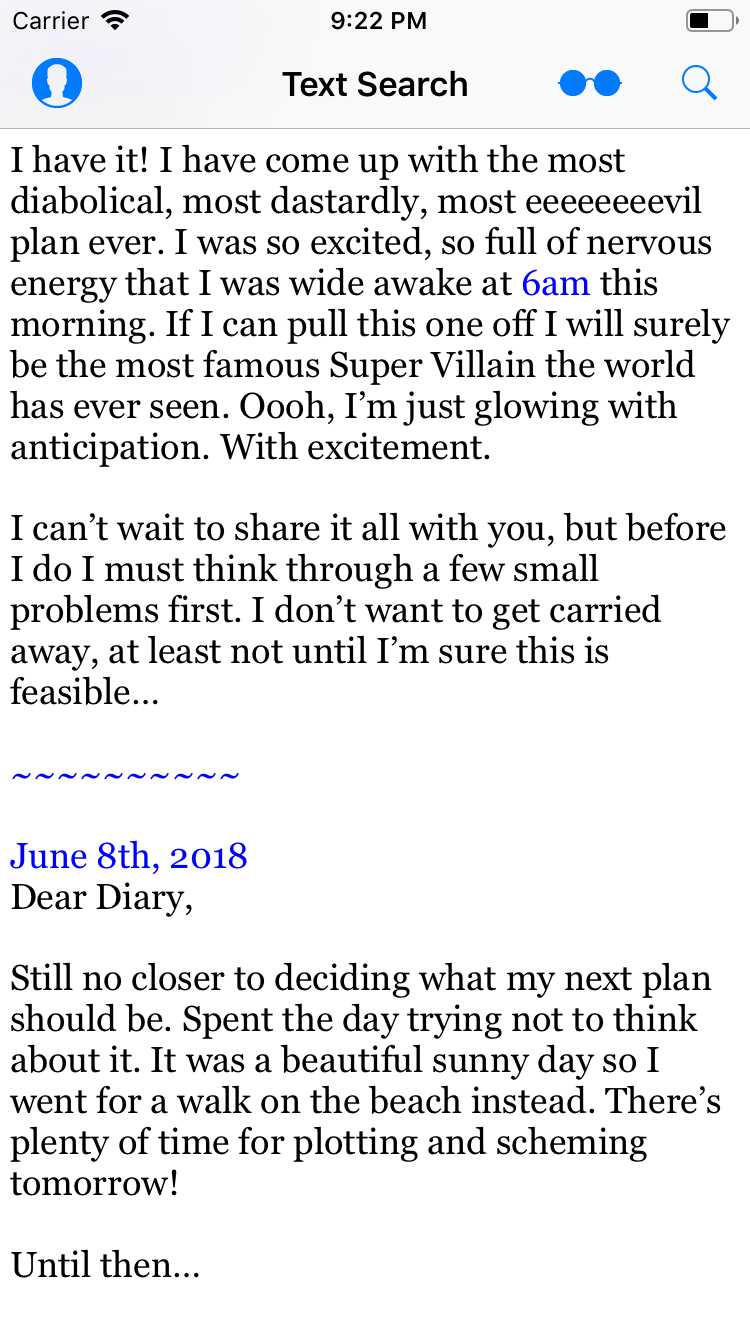
Tap the button again to disable reading mode, and return the text to its normal style.
While it’s fine for this example, can you see why the regular expression for time might not be right for more general searching? As it stands, it would not match the time 3:15pm and it would match 28pm.
Here’s a challenging problem! Figure out how to rewrite the regular expression for time so that it matches a more a general time format.
Specifically, your answer should match times in the format ab:cd am/pm for a standard 12-hour clock. So it should match: 11:45 am, 10:33pm, 04:12am but not 2pm, 0:00am 18:44am 9:63pm or 7:4 am. There should be, at most, one space before the am/pm. By the way, it’s acceptable if it matches the 4:33am in 14:33am.
One possible answer appears below, but try it yourself first. Check the end of the accompanying playground to see it in action.
[spoiler]
"(1[0-2]|0?[1-9]):([0-5][0-9]\\s?(am|pm))"
[/spoiler]
Where to Go From Here?
Congratulations! You now have some practical experience with using regular expressions.
You can download the completed version of the project using the Download Materials button at the top or bottom of this tutorial.
Regular expressions are powerful and fun to work with — they’re a lot like solving a math problem. The flexibility of regular expressions gives you many ways to create a pattern to fit your needs, such as filtering input strings for white spaces, stripping out HTML or XML tags before parsing, or finding particular XML or HTML tags — and much more!
One More Exercise…
There are a lot of real-world examples of strings that you can validate with regular expressions. As a final exercise, try to untangle the following regular expression that validates an email address :
[a-z0-9!#$%&'*+/=?^_`{|}~-]+(?:\.[a-z0-9!#$%&'*+/=?^_`{|}~-]+)*@(?:[a-z0-9](?:[a-z0-9-]*[a-z0-9])?\.)+[a-z0-9](?:[a-z0-9-]*[a-z0-9])?
It looks like a jumble of characters at first glance, but with your new-found knowledge (and the helpful links below) you’re one step closer to understanding it and becoming a master of regular expressions!
More Resources
Here is a short list of some useful resources about regular expressions:
- www.regular-expressions.info is an informative site by Jan Goyvaerts. He also has published some very comprehensive books on regular expressions.
- NSRegularExpression Class Reference is always your best reference for using NSRegularExpression API.
- For a quick test of a regex pattern, regexpal.com is very handy resource.
I hope you enjoyed this NSRegularExpression tutorial, and if you have any comments or questions, please join the forum discussion below!
Recommend
About Joyk
Aggregate valuable and interesting links.
Joyk means Joy of geeK