作者简介:智智方,西安电子科技大学硕士研究生,主要研究方向为SDN与网络安全,邮箱:[email protected]
一、前言
我们都知道在SDN架构下,交换机是根据流表来对数据流进行转发的,如果交换机收到一个在流表中无法匹配的数据流时,就会向控制器询问如何对该数据流进行处理。在OpenFlow协议下,交换机会针对每一个无法匹配的数据流产生packet-in消息并将该消息发送给控制器以询问如何对该数据流进行处理。因此当攻击者在SDN环境下制造虚假数据流或者瞬间产生大量数据流时交换机也会向控制器发送大量的packet-in消息,大量的packet-in消息会占用控制器的大量资源因而可以产生拒绝服务的攻击效果,本文针对这一问题在Opendaylight上开发了相关的应用以检测和防护这种类型的攻击。
二、架构图
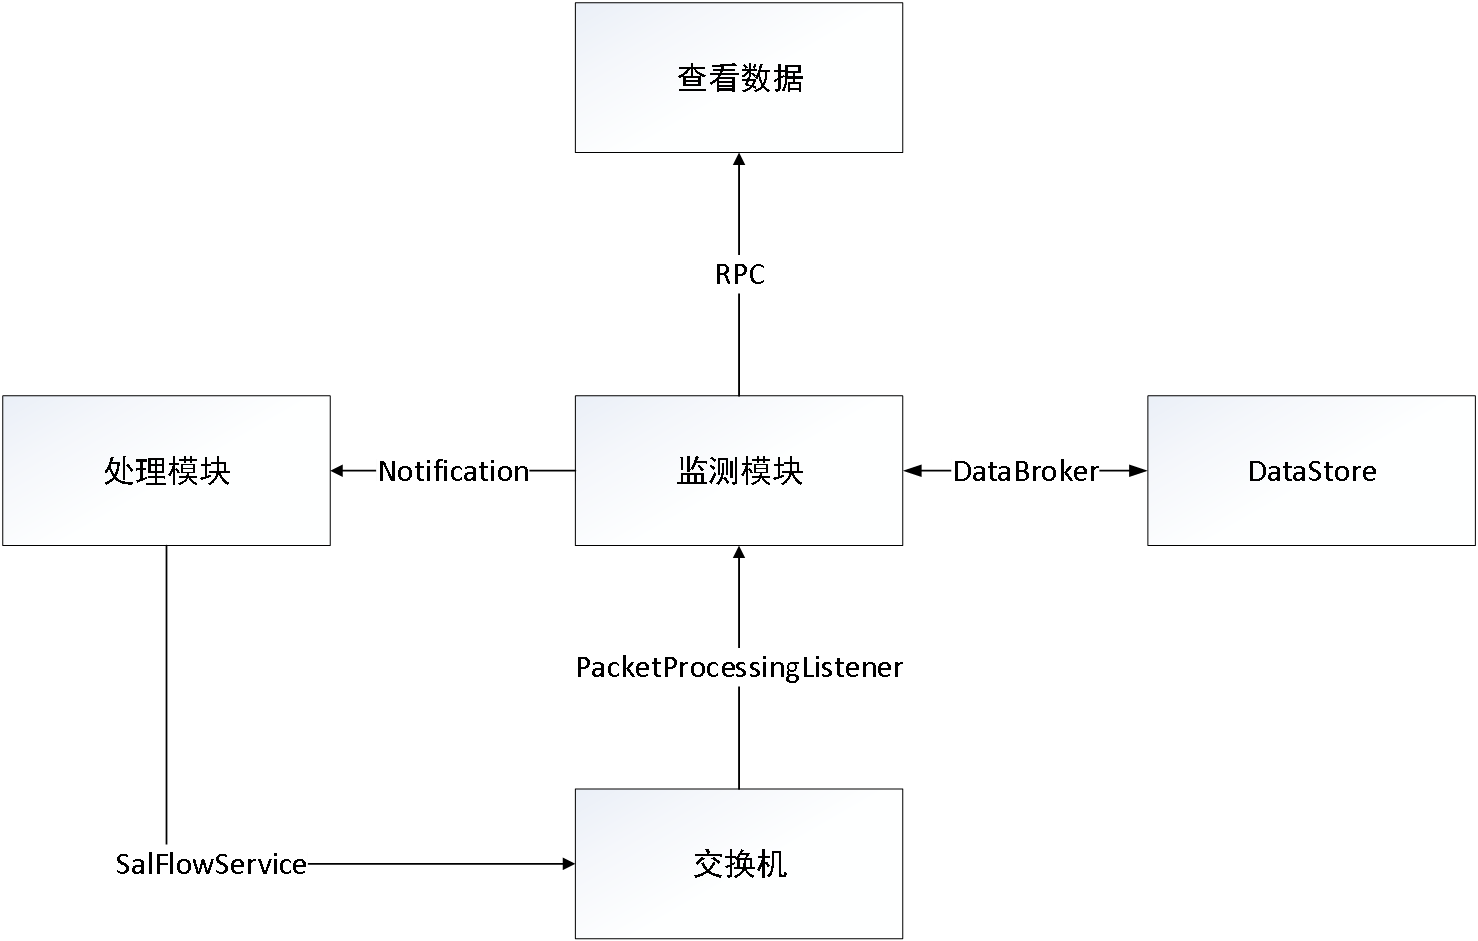
主要需要两个模块,监测模块用来计算当前packet-in消息的速率来查看是否超过警戒值,当超过警戒值以后则由处理模块来进行处理,监测模块通过PacketProcessingListener接口来接收packet-in消息,并对消息进行解析,解析出IP地址以及MAC地址等信息,然后对packet-in消息进行速率计算,当速率超过警戒值以后,通过DataBroker将相应的威胁信息记录到DataStore中,用户可以通过RPC来查看记录在DataStore中的威胁信息,然后通过发送Notification消息的方式来通知处理模块,处理模块根据IP地址以及MAC地址等信息,通过SalFlowService接口来向交换机下发流表,让交换机丢弃相应的数据流,从而实现了对packet-in flooding攻击的防护。
三、方案实现
本部分从maven建立opendaylight架构开始逐步实现每一模块,并会对关键的操作步骤和代码进行说明。
3.1 maven建立opendaylight架构
在终端输入如下指令。
mvn archetype:generate -DarchetypeGroupId=org.opendaylight.controller -DarchetypeArtifactId=opendaylight-startup-archetype -DarchetypeRepository=http://nexus.opendaylight.org/content/repositories/opendaylight.release/ -DarchetypeCatalog=remote -DarchetypeVersion=1.3.0-Carbon
mvn archetype:generate-DarchetypeGroupId=org.opendaylight.controller-DarchetypeArtifactId=opendaylight-startup-archetype-DarchetypeRepository=http://nexus.opendaylight.org/content/repositories/opendaylight.release/ -DarchetypeCatalog=remote -DarchetypeVersion=1.3.0-Carbon
构建基于Carbon版的opendaylight框架,构建完成后,这个框架只有最基本的功能,根据刚才的描述,本文建立的框架需要支持OpenFlow协议并且需要支持基本的二层交换功能,因此本框架需要有openflowplugin以及l2switch两个模块,而这两个模块在默认生成的基本框架中是不包含的,因此完成框架构建后,需要在所依赖的features中添加这两个模块。
具体做法是,打开框架中features文件夹下的pom.xml文件,在其中添加相应的依赖,首先需要在properties标签下添加openflowplugin.version以及l2switch.version。
<properties>
<mdsal.model.version>0.10.0-Carbon</mdsal.model.version>
<mdsal.version>1.5.0-Carbon</mdsal.version>
<restconf.version>1.5.0-Carbon</restconf.version>
<yangtools.version>1.1.0-Carbon</yangtools.version>
<dluxapps.version>0.5.0-Carbon</dluxapps.version>
<openflowplugin.version>0.4.0-Carbon</openflowplugin.version>
<l2switch.version>0.5.0-Carbon</l2switch.version>
<configfile.directory>etc/opendaylight/karaf</configfile.directory>
</properties>
需要注意的是版本信息需要和上述一致,否则最后在安装feature时会发生版本冲突的问题而无法安装,然后在dependencies标签中添加相应的依赖。
<dependency>
<groupId>org.opendaylight.openflowplugin</groupId>
<artifactId>features-openflowplugin</artifactId>
<classifier>features</classifier>
<version>${openflowplugin.version}</version>
<type>xml</type>
</dependency>
<dependency>
<groupId>org.opendaylight.l2switch</groupId>
<artifactId>features-l2switch</artifactId>
<classifier>features</classifier>
<version>${l2switch.version}</version>
<type>xml</type>
</dependency>
<dependency>
<groupId>org.opendaylight.openflowplugin</groupId>
<artifactId>features-openflowplugin</artifactId>
<classifier>features</classifier>
<version>${openflowplugin.version}</version>
<type>xml</type>
</dependency>
<dependency>
<groupId>org.opendaylight.l2switch</groupId>
<artifactId>features-l2switch</artifactId>
<classifier>features</classifier>
<version>${l2switch.version}</version>
<type>xml</type>
</dependency>
完成对pom.xml文件的修改以后在features\src\main\features文件夹下修改features.xml,在其中添加相应的repository。
<repository>mvn:org.opendaylight.openflowplugin/features-openflowplugin/${openflowplugin.version}/xml/features</repository>
<repository>mvn:org.opendaylight.l2switch/features-l2switch/${l2switch.version}/xml/features</repository>
<repository>mvn:org.opendaylight.openflowplugin/features-openflowplugin/${openflowplugin.version}/xml/features</repository>
<repository>mvn:org.opendaylight.l2switch/features-l2switch/${l2switch.version}/xml/features</repository>
修改完成后对整个框架进行编译,然后开启karaf后就能安装与openflowplugin和l2switch相应的feature了,然后将整个项目导入到eclipse中。
3.2监测模块的实现
监测模块的原理很简单,主要就是通过记录某一个时间段内packet-in消息的数量,然后来计算这段时间的packet-in消息的速率并和预先设置好的阈值进行比较,以判断是否达到警戒的速率值来确定是否发出Notification消息。
首先需要在api文件夹下创建yang文件来确定相应的接口和在datastore中存储的数据结构,首先要在yang文件中确定notification的具体内容:
// Notification消息传递IP地址和MAC地址等信息
notification lowWaterMarkBreached {
description
"Indicates that the Low Water Mark has Breached.";
leaf srcPort {
type uint16;
}
leaf dstPort {
type uint16;
}
leaf srcIP {
type string;
}
leaf dstIP {
type string;
}
leaf protocol {
type string;
}
leaf srcMac{
type string;
}
leaf dstMac{
type string;
}
}
1
2
3
4
5
6
7
8
9
10
11
12
13
14
15
16
17
18
19
20
21
22
23
24
25
26
// Notification消息传递IP地址和MAC地址等信息
notificationlowWaterMarkBreached{
description
"Indicates that the Low Water Mark has Breached.";
leafsrcPort{
type uint16;
}
leafdstPort{
type uint16;
}
leafsrcIP{
type string;
}
leafdstIP{
type string;
}
leafprotocol{
type string;
}
leafsrcMac{
type string;
}
leafdstMac{
type string;
}
}
需要把IP地址以及MAC地址等信息发送给处理模块,处理模块根据这些信息来下发相应的流表项。
然后用container关键字来确定相应的威胁信息在datastore中存储的数据结构,具体如下:
// 在datastore中存储的威胁信息的结构
container LWM {
list lowwatermark {
key secKey;
leaf secKey {
type string;
}
leaf nodeID {
type string;
}
leaf nodeConnectorID {
type string;
}
leaf srcIP {
type string;
}
leaf dstIP {
type string;
}
leaf protocol {
type string;
}
leaf srcPort {
type uint16;
}
leaf dstPort {
type uint16;
}
leaf packetSize {
type uint16;
}
leaf upwardTime {
type string;
}
leaf downwardTime {
type string;
}
config false;
}
}
1
2
3
4
5
6
7
8
9
10
11
12
13
14
15
16
17
18
19
20
21
22
23
24
25
26
27
28
29
30
31
32
33
34
35
36
37
38
39
40
// 在datastore中存储的威胁信息的结构
containerLWM{
listlowwatermark{
key secKey;
leafsecKey{
type string;
}
leafnodeID{
type string;
}
leafnodeConnectorID{
type string;
}
leafsrcIP{
type string;
}
leafdstIP{
type string;
}
leafprotocol{
type string;
}
leafsrcPort{
type uint16;
}
leafdstPort{
type uint16;
}
leafpacketSize{
type uint16;
}
leafupwardTime{
type string;
}
leafdownwardTime{
type string;
}
config false;
}
}
总体来说需要把威胁流量的IP地址、MAC地址、协议、端口等各种信息存储起来,以为用户提供详细的威胁信息的记录。
然后在impl下创建PacketHandler类来实现这一模块,由于这一模块需要监听packet-in消息,则该类需要实现PacketProcessingListener接口,而这个接口是由openflowplugin的相关yang model产生的,因此需要在api下的pom.xml添加相关的依赖以导入相关的接口,具体添加如下依赖。
<dependencies>
<dependency>
<groupId>org.opendaylight.openflowplugin.model</groupId>
<artifactId>model-flow-base</artifactId>
<version>0.4.0-Carbon</version>
</dependency>
<dependency>
<groupId>org.opendaylight.openflowplugin.model</groupId>
<artifactId>model-flow-service</artifactId>
<version>0.4.0-Carbon</version>
</dependency>
<dependency>
<groupId>org.opendaylight.openflowplugin</groupId>
<artifactId>openflowplugin-api</artifactId>
<version>0.4.0-Carbon</version>
</dependency>
<dependency>
<groupId>org.opendaylight.controller.model</groupId>
<artifactId>model-inventory</artifactId>
<version>1.5.0-Carbon</version>
</dependency>
</dependencies>
1
2
3
4
5
6
7
8
9
10
11
12
13
14
15
16
17
18
19
20
21
22
<dependencies>
<dependency>
<groupId>org.opendaylight.openflowplugin.model</groupId>
<artifactId>model-flow-base</artifactId>
<version>0.4.0-Carbon</version>
</dependency>
<dependency>
<groupId>org.opendaylight.openflowplugin.model</groupId>
<artifactId>model-flow-service</artifactId>
<version>0.4.0-Carbon</version>
</dependency>
<dependency>
<groupId>org.opendaylight.openflowplugin</groupId>
<artifactId>openflowplugin-api</artifactId>
<version>0.4.0-Carbon</version>
</dependency>
<dependency>
<groupId>org.opendaylight.controller.model</groupId>
<artifactId>model-inventory</artifactId>
<version>1.5.0-Carbon</version>
</dependency>
</dependencies>
添加完成后保存,maven会自动导入相关的依赖,然后就可以实现PacketProcessingListener接口了,PacketProcessingListener接口只有一个方法需要实现,即onPacketReceived,实现了PacketProcessingListener接口的类即可视为packet-in消息的监听者,在onPacketReceived方法中可以添加相应的对packet-in消息的处理逻辑,具体处理逻辑如下:
// 解析数据包
ingressNodeConnectorRef = notification.getIngress();
ingressNodeConnectorId = InventoryUtility.getNodeConnectorId(ingressNodeConnectorRef);
ingressConnector = ingressNodeConnectorId.getValue();
ingressNodeId = InventoryUtility.getNodeId(ingressNodeConnectorRef);
ingressNode = ingressNodeId.getValue();
// 从notification获取payload
payload = notification.getPayload();
// 获取payload的大小
packetSize = payload.length;
// 解析MAC地址
srcMacRaw = PacketParsing.extractSrcMac(payload);
dstMacRaw = PacketParsing.extractDstMac(payload);
srcMac = PacketParsing.rawMacToString(srcMacRaw);
dstMac = PacketParsing.rawMacToString(dstMacRaw);
………………// 其他关键信息的解析
Lwm();
1
2
3
4
5
6
7
8
9
10
11
12
13
14
15
16
17
// 解析数据包
ingressNodeConnectorRef=notification.getIngress();
ingressNodeConnectorId=InventoryUtility.getNodeConnectorId(ingressNodeConnectorRef);
ingressConnector=ingressNodeConnectorId.getValue();
ingressNodeId=InventoryUtility.getNodeId(ingressNodeConnectorRef);
ingressNode=ingressNodeId.getValue();
// 从notification获取payload
payload=notification.getPayload();
// 获取payload的大小
packetSize=payload.length;
// 解析MAC地址
srcMacRaw=PacketParsing.extractSrcMac(payload);
dstMacRaw=PacketParsing.extractDstMac(payload);
srcMac=PacketParsing.rawMacToString(srcMacRaw);
dstMac=PacketParsing.rawMacToString(dstMacRaw);
………………// 其他关键信息的解析
Lwm();
主要是通过两个工具类来实现对数据包的解析从而获取ingress switch以及各个层级的地址等相关信息,然后调用Lwm()方法。
这个方法的最核心的逻辑如下:
// 计数器加1
counter = counter + 1;
// 计算平均packet in速率
// 收到samplesLwm个数据包以后
if ((counter % samplesLwm) == 0) {
// 获取calendar
calendar = Calendar.getInstance();
// 获取当前时间
newTime = calendar.getTimeInMillis();
// 计算时间差
timeDiff = newTime - oldTime;
// 将oldTime时间更新
oldTime = newTime;
// 收到个数据包的平均速率,单位包/秒
avgPacketInRate = (samplesLwm / timeDiff) * 1000;
counter = 0;
LOG.info("Average PacketIn Rate is " + avgPacketInRate);
}
1
2
3
4
5
6
7
8
9
10
11
12
13
14
15
16
17
18
// 计数器加1
counter=counter+1;
// 计算平均packet in速率
// 收到samplesLwm个数据包以后
if((counter%samplesLwm)==0){
// 获取calendar
calendar=Calendar.getInstance();
// 获取当前时间
newTime=calendar.getTimeInMillis();
// 计算时间差
timeDiff=newTime-oldTime;
// 将oldTime时间更新
oldTime=newTime;
// 收到个数据包的平均速率,单位包/秒
avgPacketInRate=(samplesLwm/timeDiff)*1000;
counter=0;
LOG.info("Average PacketIn Rate is "+avgPacketInRate);
}
主要就是通过记录一段时间内packet-in消息的个数并除以这段时间来计算packet-in速率,然后当超过警戒值以后会通过NotificationPublishService接口来发布notification消息,并通过DataBroker接口将相应的威胁信息记录到datastore中。
3.3处理模块的实现
在impl下创建HandlerModule类,实现DefenderpluginListener接口以成为监听模块发送notification的监听者,并实现onLowWaterMarkBreached方法,在这个方法中主要是根据notification发送过来的相关信息来下发流表项,让交换机丢弃相关的数据流,具体代码如下:
// 获取全部的节点
List<Node> nodes = getAllNodes(dataBroker);
String dstMAC = notification.getDstMac();
if(!dstMAC.equals("FF:FF:FF:FF:FF:FF")) {
// 如果是APR请求的话,则不按照这个目的地址添加drop流表,防止误杀
// 遍历每一个节点,对每一个节点下发流表
// 创建一个flow
Flow flow = createProgibitFlow(notification);
for (Node node : nodes) {
NodeKey nodeKey = node.getKey();// 看Yang文件NodeKey的变量是NodeId
// 寻找Nodes根节点下的子节点,由NodeKey来寻找Nodes下的子节点
InstanceIdentifier<Node> nodeId = InstanceIdentifier.builder(Nodes.class).child(Node.class, nodeKey)
.build();
// 对每个节点下发流表
addProhibitFlow(nodeId, flow);
}
}
1
2
3
4
5
6
7
8
9
10
11
12
13
14
15
16
17
// 获取全部的节点
List<Node>nodes=getAllNodes(dataBroker);
StringdstMAC=notification.getDstMac();
if(!dstMAC.equals("FF:FF:FF:FF:FF:FF")){
// 如果是APR请求的话,则不按照这个目的地址添加drop流表,防止误杀
// 遍历每一个节点,对每一个节点下发流表
// 创建一个flow
Flow flow=createProgibitFlow(notification);
for(Node node:nodes){
NodeKey nodeKey=node.getKey();// 看Yang文件NodeKey的变量是NodeId
// 寻找Nodes根节点下的子节点,由NodeKey来寻找Nodes下的子节点
InstanceIdentifier<Node>nodeId=InstanceIdentifier.builder(Nodes.class).child(Node.class,nodeKey)
.build();
// 对每个节点下发流表
addProhibitFlow(nodeId,flow);
}
}
注意如果目的MAC地址是”FF:FF:FF:FF:FF:FF”时,这个数据包时ARP请求,则不能根据这个目的MAC地址来下发流表项,这样会影响正常的数据通信,当判断不是ARP请求后则会通过DataBroker获取当前与控制器连接的所有交换机,并根据notification消息内容创建相关的flow,然后将这一流表项下发给每个交换机,这其中也编写了Flow创建的方法和下发流表的方法。
Flow构建的步骤相对比较繁琐,在这里详细介绍一下,Opendaylight采用的Yang文件建模的方法,这种方法能直接根据Yang模型生成相应的Java接口,这些接口并不需要我们来实现,而是可以直接使用这些接口相对应的builder类来直接构建,一般来说我们只需要创建相应的builder类,然后通过它提供的set方法为相关字段赋值,最后使用期其他的build方法即可得到相应接口的实现类,一般来说Flow的构建主要有四步:
1.设置该Flow的相关ID,如tableID和flowID等。
2.设置该Flow的匹配域,可以设置数据链路层的匹配域、网络层的匹配域等。
3.设置该Flow的指令,设置指令主要是设置该Flow的处理动作,即交换机收到相应的数据流后对其如何处理。
4.设置该Flow的其他属性,比如优先级、该Flow在流表中的存在时间以及其他标志位等。
下面结合代码来具体说明一下,首先要设置相关的ID:
// 设置名字和tableID以及flowID
// 要新建一个Flow先创建相应的Builder类
FlowBuilder builder = new FlowBuilder();
// TableID设置为0,因为有多级流表的概念,一个简单的流只需要设置到第一个流
// 表中,即ID为0的流表中即可
builder.setFlowName("prohibitFlow").setTableId(Short.valueOf("0"));
// FlowID只需要和其他Flow区别即可
builder.setId(new FlowId(Long.toString(builder.hashCode())));
// 设置名字和tableID以及flowID
// 要新建一个Flow先创建相应的Builder类
FlowBuilder builder=newFlowBuilder();
// TableID设置为0,因为有多级流表的概念,一个简单的流只需要设置到第一个流
// 表中,即ID为0的流表中即可
builder.setFlowName("prohibitFlow").setTableId(Short.valueOf("0"));
// FlowID只需要和其他Flow区别即可
builder.setId(newFlowId(Long.toString(builder.hashCode())));
然后来设置匹配域:
// 首先创建相应的builder
MatchBuilder matchBuilder = new MatchBuilder();
// 匹配域的种类很多,这里介绍一下二层的匹配域,即通过MAC地址匹配
EthernetMatchBuilder ethernetMatchBuilder = new EthernetMatchBuilder();
// 目的地址和源地址都是接口,都需要用相应的builder来赋值和构建
EthernetDestinationBuilder ethernetDestinationBuilder = new EthernetDestinationBuilder();
ethernetDestinationBuilder.setAddress(new MacAddress(dstMAC));
ethernetMatchBuilder.setEthernetDestination(ethernetDestinationBuilder.build());
EthernetSourceBuilder ethernetSourceBuilder = new EthernetSourceBuilder();
ethernetSourceBuilder.setAddress(new MacAddress(srcMAC));
ethernetMatchBuilder.setEthernetSource(ethernetSourceBuilder.build());
matchBuilder.setEthernetMatch(ethernetMatchBuilder.build());
// 匹配域设置好后赋值给Flow的builder
builder.setMatch(matchBuilder.build());
// 首先创建相应的builder
MatchBuilder matchBuilder=newMatchBuilder();
// 匹配域的种类很多,这里介绍一下二层的匹配域,即通过MAC地址匹配
EthernetMatchBuilder ethernetMatchBuilder=newEthernetMatchBuilder();
// 目的地址和源地址都是接口,都需要用相应的builder来赋值和构建
EthernetDestinationBuilder ethernetDestinationBuilder=newEthernetDestinationBuilder();
ethernetDestinationBuilder.setAddress(newMacAddress(dstMAC));
ethernetMatchBuilder.setEthernetDestination(ethernetDestinationBuilder.build());
EthernetSourceBuilder ethernetSourceBuilder=newEthernetSourceBuilder();
ethernetSourceBuilder.setAddress(newMacAddress(srcMAC));
ethernetMatchBuilder.setEthernetSource(ethernetSourceBuilder.build());
matchBuilder.setEthernetMatch(ethernetMatchBuilder.build());
// 匹配域设置好后赋值给Flow的builder
builder.setMatch(matchBuilder.build());
然后来设置相应的指令:
// 首先创建相应的builder
InstructionsBuilder instructionsBuilder = new InstructionsBuilder();
// instructionsBuilder需要赋值一个指令列表,需要先构建一个单独的Instruction
InstructionBuilder instructionBuilder = new InstructionBuilder();
// 查看yang文件中instruction是由choice来定义的,我们可以用choice中包含好
// 多case,我们可以选择其中一个case为其赋值,这里选的是apply-actions-case
// 这个case可以设置一些简单的处理动作比如从哪个端口转发或者是丢弃等
ApplyActionsCaseBuilder actionsCaseBuilder = new ApplyActionsCaseBuilder();
// 同样我们需要为actionsCaseBuilder赋值,需要为其赋值一个Action列表
ApplyActionsBuilder actionsBuilder = new ApplyActionsBuilder();
ActionBuilder actionBuilder = new ActionBuilder();
// 通过查看yang文件每一个Action实际也是choice定义的,因此同样需要为其选
// 择一个case,因为我们需要让交换机将这个数据流丢弃,因此我们选用
// drop-action-case
actionBuilder.setAction(new DropActionCaseBuilder().setDropAction(new DropActionBuilder().build()).build());
// 最后从Action逐步向外赋值一层一层嵌套最后设置完指令
List<org.opendaylight.yang.gen.v1.urn.opendaylight.action.types.rev131112.action.list.Action> action = new ArrayList<>();
action.add(actionBuilder.build());
actionsBuilder.setAction(action);
actionsCaseBuilder.setApplyActions(actionsBuilder.build());
instructionBuilder.setInstruction(actionsCaseBuilder.build());
List<Instruction> instructions = new ArrayList<>();
instructions.add(instructionBuilder.build());
instructionsBuilder.setInstruction(instructions);
// 设置指令
builder.setInstructions(instructionsBuilder.build());
1
2
3
4
5
6
7
8
9
10
11
12
13
14
15
16
17
18
19
20
21
22
23
24
25
26
// 首先创建相应的builder
InstructionsBuilder instructionsBuilder=newInstructionsBuilder();
// instructionsBuilder需要赋值一个指令列表,需要先构建一个单独的Instruction
InstructionBuilder instructionBuilder=newInstructionBuilder();
// 查看yang文件中instruction是由choice来定义的,我们可以用choice中包含好
// 多case,我们可以选择其中一个case为其赋值,这里选的是apply-actions-case
// 这个case可以设置一些简单的处理动作比如从哪个端口转发或者是丢弃等
ApplyActionsCaseBuilder actionsCaseBuilder=newApplyActionsCaseBuilder();
// 同样我们需要为actionsCaseBuilder赋值,需要为其赋值一个Action列表
ApplyActionsBuilder actionsBuilder=newApplyActionsBuilder();
ActionBuilder actionBuilder=newActionBuilder();
// 通过查看yang文件每一个Action实际也是choice定义的,因此同样需要为其选
// 择一个case,因为我们需要让交换机将这个数据流丢弃,因此我们选用
// drop-action-case
actionBuilder.setAction(newDropActionCaseBuilder().setDropAction(newDropActionBuilder().build()).build());
// 最后从Action逐步向外赋值一层一层嵌套最后设置完指令
List<org.opendaylight.yang.gen.v1.urn.opendaylight.action.types.rev131112.action.list.Action>action=newArrayList<>();
action.add(actionBuilder.build());
actionsBuilder.setAction(action);
actionsCaseBuilder.setApplyActions(actionsBuilder.build());
instructionBuilder.setInstruction(actionsCaseBuilder.build());
List<Instruction>instructions=newArrayList<>();
instructions.add(instructionBuilder.build());
instructionsBuilder.setInstruction(instructions);
// 设置指令
builder.setInstructions(instructionsBuilder.build());
最后来设置该Flow的其他项:
// 设置其他项
builder.setPriority(50);
builder.setHardTimeout(9999);
builder.setIdleTimeout(9999);
// 全部设置完成后调用build方法并返回
return builder.build();
// 设置其他项
builder.setPriority(50);
builder.setHardTimeout(9999);
builder.setIdleTimeout(9999);
// 全部设置完成后调用build方法并返回
returnbuilder.build();
整个Flow的构建步骤相对繁琐,建议在构建时应该比对Flow的yang文件按照其规定的数据结构一项一项赋值。
3.4 RPC的实现
RPC主要为用户提供查看攻击消息的功能,具体来说用户可以根据源IP地址和目的IP地址来查看该IP地址被攻击或者发动攻击的相关记录,也可以根据用户输入的时间段来查看这段时间内发生的攻击事件,当然也可以根据需求来添加其他的RPC,但是原理都是一样的,都是根据用户的输入从datastore中查找相关的信息,并将这些消息封装成Future来返回。
首先在yang文件中定义相关的RPC:
// 根据源IP地址来查找攻击
rpc attacksFromIP {
input {
leaf SrcIP {
type string;
}
}
output {
uses alert;
}
}
// 根据目的IP地址来查找攻击
rpc attacksToIP {
input {
leaf DstIP {
type string;
}
}
output {
uses alert;
}
}
// 根据时间和窗口获取攻击
rpc attacksInTime {
input {
leaf FromTime {
type string;
}
leaf EndTime {
type string;
}
}
output {
uses alert;
}
}
1
2
3
4
5
6
7
8
9
10
11
12
13
14
15
16
17
18
19
20
21
22
23
24
25
26
27
28
29
30
31
32
33
34
35
36
// 根据源IP地址来查找攻击
rpcattacksFromIP{
input{
leafSrcIP{
type string;
}
}
output{
uses alert;
}
}
// 根据目的IP地址来查找攻击
rpcattacksToIP{
input{
leafDstIP{
type string;
}
}
output{
uses alert;
}
}
// 根据时间和窗口获取攻击
rpcattacksInTime{
input{
leafFromTime{
type string;
}
leafEndTime{
type string;
}
}
output{
uses alert;
}
}
其中alert是用grouping定义的公共字段,包括IP地址、MAC地址以及协议等信息。然后创建DefenderRPCImpl类来实现相应的RPC,由于几种RPC的实现原理都类似,这里只选择根据源IP地址来查看该IP地址发动攻击的相关记录的RPC的实现来进行解释,代码如下:
public Future<RpcResult<AttacksFromIPOutput>> attacksFromIP(AttacksFromIPInput input) {
// 从输入中获取源IP地址
String srcIP = input.getSrcIP();
// 用DataBroker建立只读事务
ReadOnlyTransaction readOnly = dataBroker.newReadOnlyTransaction();
// 从该路径下获取所有攻击记录然后根据条件筛选返回
InstanceIdentifier<LWM> instanceIdentifier = InstanceIdentifier.builder(LWM.class).build();
Optional<LWM> results = null;
try {
results = readOnly.read(LogicalDatastoreType.OPERATIONAL, instanceIdentifier).get();
} catch (InterruptedException | ExecutionException e) {
e.printStackTrace();
}
LWM lwm = null;
if (results.isPresent()) {
lwm = results.get();
}
List<Lowwatermark> resultList = lwm.getLowwatermark();
List<Alerts> alerts = new ArrayList<>();
AlertsBuilder builder = new AlertsBuilder();
// 遍历从数据库中读取的每一项记录
for (Lowwatermark low : resultList) {
// 按照源IP地址进行筛选
if (low.getSrcIP().equals(srcIP)) {
builder.setDownTime(low.getDownwardTime());
builder.setUpTime(low.getUpwardTime());
builder.setDstIP(low.getDstIP());
builder.setSrcIP(low.getSrcIP());
builder.setDstMac(low.getDstMAC());
builder.setSrcMac(low.getSrcMAC());
builder.setDstPort(low.getDstPort());
builder.setSrcPort(low.getSrcPort());
builder.setProtocol(low.getProtocol());
alerts.add(builder.build());
}
}
// 创建Output的builder类并将相关记录赋值
AttacksFromIPOutputBuilder outputBuilder = new AttacksFromIPOutputBuilder();
outputBuilder.setAlerts(alerts);
// 最后用RpcResultBuilder构建Future来返回
return RpcResultBuilder.success(outputBuilder.build()).buildFuture();
}
1
2
3
4
5
6
7
8
9
10
11
12
13
14
15
16
17
18
19
20
21
22
23
24
25
26
27
28
29
30
31
32
33
34
35
36
37
38
39
40
41
42
publicFuture<RpcResult<AttacksFromIPOutput>>attacksFromIP(AttacksFromIPInput input){
// 从输入中获取源IP地址
StringsrcIP=input.getSrcIP();
// 用DataBroker建立只读事务
ReadOnlyTransaction readOnly=dataBroker.newReadOnlyTransaction();
// 从该路径下获取所有攻击记录然后根据条件筛选返回
InstanceIdentifier<LWM>instanceIdentifier=InstanceIdentifier.builder(LWM.class).build();
Optional<LWM>results=null;
try{
results=readOnly.read(LogicalDatastoreType.OPERATIONAL,instanceIdentifier).get();
}catch(InterruptedException|ExecutionExceptione){
e.printStackTrace();
}
LWM lwm=null;
if(results.isPresent()){
lwm=results.get();
}
List<Lowwatermark>resultList=lwm.getLowwatermark();
List<Alerts>alerts=newArrayList<>();
AlertsBuilder builder=newAlertsBuilder();
// 遍历从数据库中读取的每一项记录
for(Lowwatermark low:resultList){
// 按照源IP地址进行筛选
if(low.getSrcIP().equals(srcIP)){
builder.setDownTime(low.getDownwardTime());
builder.setUpTime(low.getUpwardTime());
builder.setDstIP(low.getDstIP());
builder.setSrcIP(low.getSrcIP());
builder.setDstMac(low.getDstMAC());
builder.setSrcMac(low.getSrcMAC());
builder.setDstPort(low.getDstPort());
builder.setSrcPort(low.getSrcPort());
builder.setProtocol(low.getProtocol());
alerts.add(builder.build());
}
}
// 创建Output的builder类并将相关记录赋值
AttacksFromIPOutputBuilder outputBuilder=newAttacksFromIPOutputBuilder();
outputBuilder.setAlerts(alerts);
// 最后用RpcResultBuilder构建Future来返回
returnRpcResultBuilder.success(outputBuilder.build()).buildFuture();
}
其他几种RPC的实现类似,只不过改变一下筛选条件。
四、测试
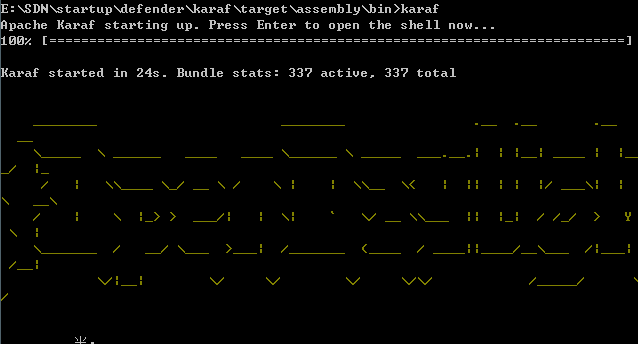
对整个项目编译完成后启动karaf\target\assembly\bin下的karaf
然后安装相应的feature,在终端输入如下命令:
feature:install odl-restconf-all
feature:install odl-l2switch-switch-ui
feature:install odl-openflowplugin-flow-services-ui
feature:install odl-mdsal-all
feature:install odl-dluxapps-applications
feature:install odl-dluxapps-yangutils
feature:install odl-restconf-all
feature:install odl-l2switch-switch-ui
feature:install odl-openflowplugin-flow-services-ui
feature:install odl-mdsal-all
feature:install odl-dluxapps-applications
feature:install odl-dluxapps-yangutils
然后启动mininet,测试时使用的是2.2.2版本的mininet,在mininet终端中输入如下指令与控制器进行连接:
sudo mn --controller=remote,ip=192.168.56.1,port=6653 --topo linear,3
sudo mn--controller=remote,ip=192.168.56.1,port=6653--topo linear,3
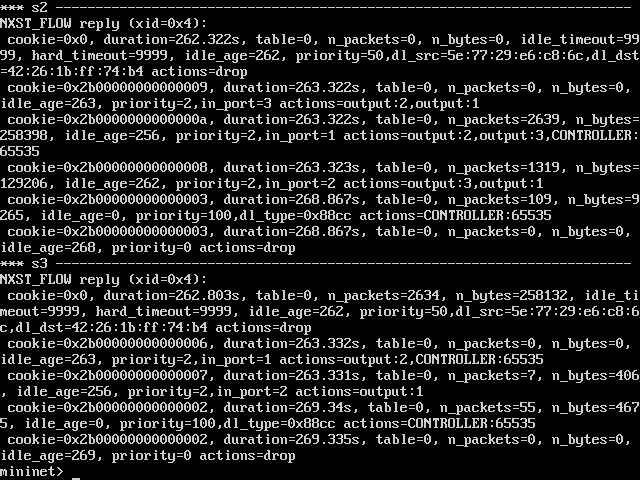
同时在karaf终端中输入log:tail来显示相关的日志信息,连接上控制器以后,在mininet上输入h1 ping -f h2命令产生大量的请求数据,由于交换机流表中没有相应的流表项,因此会触发大量的packet-in消息从而来模拟packet-in flooding攻击,此时在karaf终端上输出如下日志:
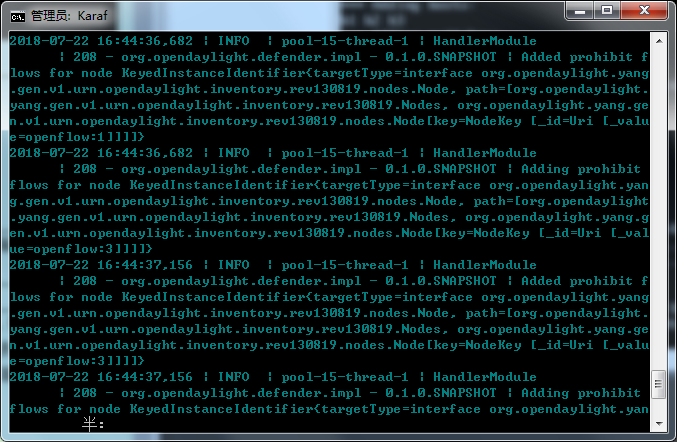
说明已经检测到packet-in flooding攻击,并下发流表给mininet中虚拟的交换机,然后在mininet中输入dpctl dump-flows,可以看到在交换机上已经存在了actions=drop的流表项,此时切断了h1和h2之间的通信,从而防止了packet-in flooding攻击。
然后我们登录到opendaylight为我们提供的web页面,在yangman中选择defenderplugin module,然后选择Operations中的attacksToIP的RPC在其中输入10.0.0.2,即刚才被攻击的主机的IP地址,此时可以看到我们可以通过目的IP地址查看到刚才的攻击记录。
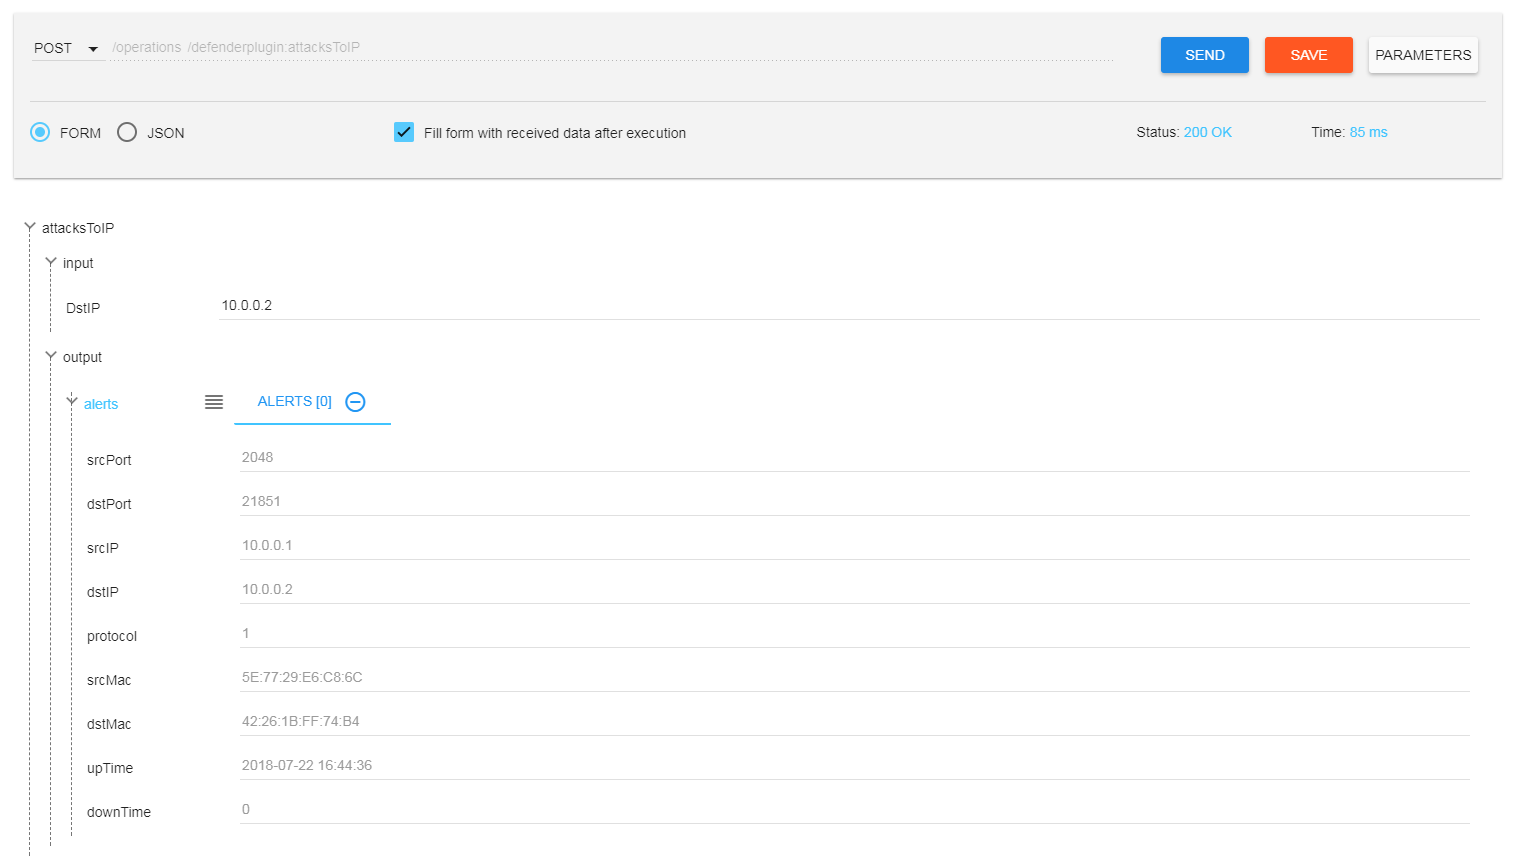
同样的我们也可以通过其他的RPC根据不同的筛选条件来获取相关的攻击记录。
五、总结
本实验在opendaylight上实现了对packet-in flooding攻击的检测与防护,也同时用到了opendaylight的MD-SAL为我们提供的三种基本服务以及通过SalFlowService接口下发流表的方法,篇幅有限很多细节也没有展开,如有兴趣欢迎大家和我交流!
附源码链接:https://pan.baidu.com/s/1SJCUIcDzaKJijp7O1Z77yA

