

Create ML Tutorial: Getting Started
source link: https://www.tuicool.com/articles/hit/M3mm2yf
Go to the source link to view the article. You can view the picture content, updated content and better typesetting reading experience. If the link is broken, please click the button below to view the snapshot at that time.

Create ML is proof that Apple is committed to making it easier for you to use machine learning models in your apps. In this Create ML tutorial, you’ll learn how Create ML speeds up the workflow for improving your model by improving your data while also flattening the learning curve by doing it all in the comfort of Xcode and Swift.
At the same time, you’ll gain familiarity with ML toolsets and terminology. No math needed! You don’t need to know how to write a compiler to use Swift, and you don’t need to be able to write a new ML algorithm to use a classifier. With Create ML, you have no excuse not to get started!
A brief history of Apple ML:
- Core ML : Announced at WWDC 2017, and already supported by every major ML platform to convert existing models. But the existing models tend to be too big and/or too general.
- Turi Create : Acquired by Apple sometime after WWDC 2017, it lets you customize existing models with your own data. But … Python :[.
- IBM Watson Services : Announced in March 2018. You can customize IBM Watson’s visual recognition model to recognize your own data. Drag-and-drop your data, no coding required, but you have to navigate the IBM Cloud maze, and the Core ML model is wrapped in the Watson API.
- Create ML : Announced at WWDC 2018. ML in Xcode & Swift! Currently includes only two of Turi Create’s seven task-focused toolkits, plus a generic classifier and regressor, and data tables. I see it as a trail of breadcrumbs leading you to the Turi Create gingerbread house, inhabited by a “good dog” instead of a witch! (Turi Create’s logo is a dog silhouette.)
You’ll start this Create ML tutorial with the spectacular Create ML party trick: You’ll build an image classifier in a GUI, using images from the Kaggle Cats and Dogs Dataset . Then you’ll compare this with the Turi Create example that uses the same dataset. As you’ll see, Turi Create is more manual, but it’s also more flexible and not at all mysterious! For a more code-based example, you’ll compare the text classifier code for Create ML and Turi Create.
Then I’ll show you how to quickly set up an environment to work with Turi Create. Apple has even modified Xcode playgrounds to behave more like Jupyter notebooks, so the coding environment will feel familiar! To try it out, you’ll use Turi Create in a Jupyter notebook to build an image similarity model for the same cats and dogs dataset.
You could wait and hope for Apple to move the rest of Turi Create to Create ML, but you’ll see it’s not hard to use Create ML as a stepping stone to working directly with Turi Create. If you need more than Turi Create, we have tutorials on “rolling your own” withKeras,scikit-learn and Caffe (coming soon). And the ML universe has a wealth of starting points, all available to you, once you’re comfortable with the development environment.
Note : What about Swift for TensorFlow ? Create ML is ML for Swift people, while Swift for TensorFlow is Swift for ML people — the project aims to provide a better programming language, with compiler support.
Getting Started
To work through this Create ML tutorial, you need:
- a Mac running macOS 10.14 Mojave beta
- Xcode 10.x beta
Click the Download Materials button at the top or bottom of this tutorial. The starter folder contains:
- Pets-100 , Pets-1000 and Pets-Testing : These contain images of cats and dogs; you’ll use these to train and evaluate a cat-dog classifier.
- ClassifyingImagesWithVisionAndCoreML : Apple’s sample project for CoreML; you’ll replace the MobileNet model with the model you train in Create ML.
- good-dog.png : An additional dog picture.
- turienv.yaml : You’ll use this file to create an environment where you can run Turi Create code.
Create ML Image Classifier
First, prepare your data — you’re going to train an image classifier model to recognize images of cats and dogs. When you show it an image, it will return the label “Cat” or “Dog”. To train the model, you need a Cat folder with images of cats and a Dog folder with images of dogs. Ideally, there should be about the same number of images in each class folder — if you have 30 cat images and 200 dog images, the model will be biased towards classifying images as Dog. And don’t include any images that contain both kinds of animal.
How many images of each class? At least 10, but more images will train the model to be more accurate. The Kaggle Cats and Dogs Dataset has 12,500 images of each class, but you don’t need to use all of them! Training time increases when you use more images — doubling the number of images roughly doubles the training time.
To train a Create ML image classifier, you give it a training dataset — a folder containing the class folders. Actually, the starter folder contains two datasets I prepared earlier ;]. Pets-100 contains the first 50 images of the Kaggle dataset’s Cat and Dog class folders; Pets-1000 has the first 500 images of each.

After training the model, you’ll need a testing dataset to evaluate the model: a folder containing Cat and Dog folders. The images in the testing dataset should be different from the images in the training dataset, because you want to evaluate how well the model works on images it hasn’t seen before. If you’re collecting your own data, you would put 20% of your images in the testing dataset, and the rest in the training dataset. But we have 12,500 images of each class to play with, so Pets-Testing contains images 900 to 999 from each Kaggle dataset class folder.
You’ll start by training the model with Pets-100 , and test it with Pets-Testing . Then you’ll train it with Pets-1000 , and test it with Pets-Testing .
Apple’s Spectacular Party Trick
In Xcode 10, create a new macOS playground, and enter this code:
import CreateMLUI

let builder = MLImageClassifierBuilder()
builder.showInLiveView()
Show the assistant editor, and click the run button:

You’re creating and showing an interactive view for training and evaluating an image classifier. It’s brilliant! It magically makes it easy for you experiment with different datasets — because what matters is not who has the best algorithms, but who has the best data ;]. The algorithms are already very good, and you can let the data science researchers carry on with making them better. But garbage in, garbage out; most of the time, effort, expense of machine learning goes into curating the datasets. And this GUI image classifier helps you hone your data curating skills! Feel free to download the Kaggle Cats and Dogs Dataset and create your own datasets. After you see what my datasets produce, you might want to be more careful selecting from this grab bag of good, bad and awful images.
Drag the Pets-100 folder onto the view. The training process starts immediately. Images load, with a progress bar below. After a short time, a table appears in the debug area, displaying Images Processed , Elapsed Time and Percent Complete :

What’s happening here? It’s called transfer learning , if you want to look it up. The underlying model — VisionFeaturePrint_Screen , which backs the Vision framework — was pre-trained on a ginormous dataset to recognize an enormous number of classes. It did this by learning what features to look for in an image, and how to combine these features to classify the image. Almost all of the training time for your dataset is the model extracting around 1000 features from your images. These could include low-level shapes and textures and higher-level shape of ears, distance between eyes, shape of snout. Then it spends a relatively tiny amount of time training a logistic regression model to separate your images into two classes. It’s similar to fitting a straight line to scattered points, but in 1000 dimensions instead of 2. But it’s still very quick to do: my run 1m 15s for feature extraction and 0.177886 seconds to train and apply the logistic regression.
Transfer learning only works successfully when features of your dataset are reasonably similar to features of the dataset that was used to train the model. A model pre-trained on ImageNet — a large collection of photos — might not transfer well to pencil drawings or microscopy images.
You might like to browse two fascinating articles about features from (mostly) Google Brain/Research:
On a 2017 MacBook Pro with a 2.9GHz i7 CPU, the feature extraction time drops to 11.27s and training takes 0.154341 seconds .
Training & Validation Accuracy
When training finishes, the view displays Training and (sometimes) Validation accuracy metrics, with details in the debug area:

I got 100% training and validation accuracy! This time . Your mileage may vary, because the validation set is randomly chosen for each training session, so your validation set will be a different 10 images. There’s no way of knowing which images are chosen.
So what’s validation ? And what do the accuracy figures mean?
Training accuracy is easy: Training involves guessing how much weight to give each feature to compute the answer. Because you labeled your images “Cat” or “Dog”, the training algorithm can check its answers and compute what percentage it got right. Then, it feeds the right-or-wrong information into the next iteration to refine the weights.
Validation accuracy is similar: Before training starts, a randomly chosen 10% of the dataset is split off to be validation data. Features are extracted and answers are computed with the same weights as the training dataset. But the results aren’t used directly for recomputing the weights. Their purpose is to prevent the model overfitting — getting fixated on a feature that doesn’t actually matter, like a background color or lighting. If validation accuracy is very different from training accuracy, the algorithm makes adjustments to itself. So the choice of validation images affects both the validation accuracy and the training accuracy. Turi Create lets you provide a fixed validation dataset if you’ve created one with similar characteristics to your testing data. And your testing dataset is a good representation of what your users will feed to your app.
Evaluation
The real question is: how well does the model classify images it didn’t train on?
The view prompts you to Drop Images to Begin Testing : drag the Pets-Testing folder onto the view. Very soon, the view displays Evaluation accuracy, with details in the debug area:

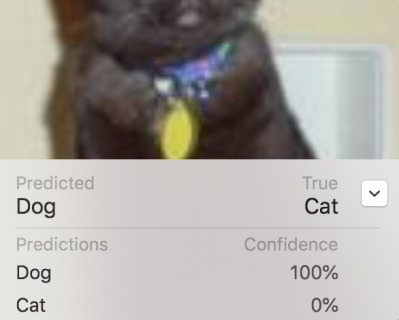
97% accuracy: the confusion matrix says two cat images were misclassified as dog, and four dog images were misclassified as cat. Scroll through the test images, to see which ones confused the model. There’s one in the screenshot above, and here’s the other confusing cat:

They’re pretty awful photos: one is blurry and too bright, the other is blurry with much of the head cropped off. The model resizes the images to 299×299, often cropping the edges, so the object you care about should ideally be centered in the image, but not too big or too small.
In the screenshot above, I clicked the disclosure button to see the confidence level: the model is 100% confident this cat is a dog! But scroll through the other images to see how the model gets it right for some pretty terrible images.
Improving Accuracy
The Pets-100 training dataset used only 50 of the 12,500 images for each class. Create ML makes it super easy to experiment with different data sets, to see whether more data improves accuracy.
Click the playground’s stop button, then click it again when it becomes a run button. This loads a new view, ready to accept training data.

Drag the Pets-1000 folder onto the view. Extracting features from 1000 images will take five to ten times longer than 100. While you’re waiting, here’s a summary of Apple’s helpful article Improving Your Model’s Accuracy , which gives specific advice for improving the different accuracy metrics.
Improving Training Accuracy
- Increase Max iterations for image classifiers. (This isn’t working in the first Xcode beta, but will work in the second beta.)
- Use different algorithms for text classifiers.
- Use different models for generic classifiers or regressors.

Improving Validation Accuracy
- Increase the amount of data: for image classifiers, you can augment your image data by flipping, rotating, shearing or changing the exposure of images. Here’s Apple’s illustration of data augmentation :

- Possible overfitting: reduce Max iterations . You probably don’t have to worry about this here, because my training run stopped when it was happy with the results, before reaching 10 iterations.
Improving Evaluation Accuracy
Make sure the diversity of characteristics of your training data match those of your testing data, and both sets are similar to the data your app users will feed to your model.
Back to the Playground
Training with 1000 images got 100% training accuracy, but only 96% validation accuracy, Again, YMMV — I’ve run this a few times, and sometimes get 99% validation accuracy.

Drag the Pets-Testing folder onto the view to evaluate this model; it gets 98.5% accuracy on the 200 test images!

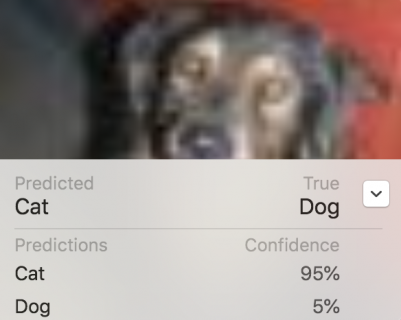
The confusion matrix says the model classified three of the cat images as dog. Actually, there are only the same two cats mislabelled as dogs — with 100% confidence!

Although the confusion matrix doesn’t say so, there are two dogs labelled as cats, but with lower confidence. They’re also blurry, with low contrast:

Probably the only way to further improve this model is to use more data, either by augmenting the 1000 images, or by adding more images from the full Kaggle dataset. Or by selecting your datasets more carefully to leave out really awful images that you don’t want your app to handle. Feel free to experiment! Remember it’s easy to do — the training just takes longer with larger datasets. I’ve run this with 5000 images: it took 32 minutes, and I got 99% for both training and validation accuracies … that time .
Increase Max Iterations?
The accuracy metrics for this example are actually pretty good — the underlying model probably already knows all about cats and dogs. But if you’re training for different classes, and getting low training accuracy , you’ll want to try increasing Max iterations to 20 . At the time of writing this tutorial with the first Xcode beta, that’s not implemented. But here’s how you’d do it.
Stop and start the playground, then click the disclosure symbol next to ImageClassifier to show the options, change 10 to 20, and press Enter :

Click the disclosure symbol to hide the options, then open the options again to check Max iterations is still 20.
If you’re using Xcode beta 2 or later, drag your training folder onto the view to start training. This will take a little longer than the 10-iteration training session, but the feature extraction will take the same amount of time, and that’s the bulk of it.
Note : The Create in both Create ML and Turi Create is a problem — you can’t train a model without creating a new one. To increase the number of iterations, you have to start all over and extract the exact same features as before. The Create ML GUI doesn’t give you the option of saving the features. A more manual framework, like Keras, constructs, compiles, then fits a model, so running the fit instruction again actually starts where it left off. It’s actually possible to peer into Turi Create’s source code and pull out the lower-level code that extracts features from the images — the part that uses most of the time. Then, you can save the extracted features and reload them whenever you want to do more training iterations! Hopefully this motivates you to be more interested in Turi Create and perhaps also in Keras!
Using the Image Classifier
This is a continuation of Apple’s spectacular party trick :]. The Create ML GUI exports a Core ML model, then you just drag your model into the old Core ML project, change one word in the code, and you’re good to go!
Click the disclosure symbol next to ImageClassifier to see a different set of options. Click on the text, and change it to PetsClassifier . Change the Where location to the starter folder, then click Save :

Open the ClassifyingImagesWithVisionAndCoreML project in the starter folder. This is Apple’s 2017 project: I’ve updated it to Swift 4.2, and fixed the photo picker call. It uses MobileNet.mlmodel, which is 17.1 MB:

Drag PetsClassifier.mlmodel into the project navigator. It’s 17 KB :

Search the project for MobileNet :

In the let model code statement, replace MobileNet with PetsClassifier :
let model = try VNCoreMLModel(for: PetsClassifier().model)
Build and run. Click the camera icon to open the photo picker, then drag some dog and cat images into Photos :

Select one; the app classifies it as a dog or a cat by showing the probability of each label:

Turi Create Image Classifier
Here’s the code from the Turi Create image classifier example for the same dataset — the full 25,000-image dataset:
import turicreate as tc

# 1. Load images (Note: you can ignore 'Not a JPEG file' errors)
data = tc.image_analysis.load_images('PetImages', with_path=True)

# 2. From the path-name, create a label column
data['label'] = data['path'].apply(lambda path: 'dog' if '/Dog' in path else 'cat')

# Note: If you have more than two classes, extract the folder names like this:
# train_data["label"] = train_data["path"].apply(lambda path: os.path.basename(os.path.split(path)[0]))

# 3. Make a train-test split
train_data, test_data = data.random_split(0.8)

# 4. Create the model
model = tc.image_classifier.create(train_data, target='label')

# 5. Save predictions to an SArray
predictions = model.predict(test_data)

# 6. Evaluate the model and save the results into a dictionary
metrics = model.evaluate(test_data)
print(metrics['accuracy'])

# 7. Save the model for later use in Turi Create
model.save('mymodel.model')

# 8. Export for use in Core ML
model.export_coreml('MyCustomImageClassifier.mlmodel')
It’s a lot more code than you wrote in the playground, but you’ll soon see that it’s similar to the Create ML text classifier code.
Matching up the steps with what you did in Create ML:
- Steps 1 to 4 correspond to creating the Training and Testing folders, then dragging the Training folder onto the view. Turi Create must extract the class labels from the paths of the images, but step 3 randomly allocates 20% of the dataset to
test_data, which saves you the work of creating the Training and Testing folders, and you also get a different testing dataset each time you run this code.
Note : In Step 2, extracting the class labels for just two classes is a special case. I’ve added a note in the code above, to show the more general case. First, os.path.split() splits the path into two pieces: the name of the file (like 42.jpg) and everything leading up to it. Then os.path.basename() is the name of the last folder, which is the one with the class name.
predictions
So Turi Create image classification is more manual, but more flexible than Create ML. The turicreate.create() documentation lists several optional parameters. You can specify the underlying model to match Create ML. Note the difference in the sizes of the Core ML models! You can also supply a fixed validation_set , if you’ve created one that really represents your real test data and don’t want the model to use a random selection from your training data.
Image classification is a very special case in Create ML: The MLImageClassifierBuilder GUI removes the need — and the opportunity — to write code. In the next section, you’ll see that other Create ML models also require more code.
Text Classifier
Now compare how Create ML and Turi Create train and test a text classifier model. The Turi Create model needs test text converted into a bag of words — this is a straightforward transformation that’s built into the Create ML model, so it accepts test text directly.
Create ML
Here’s the code for the Create ML text classifier example :
import CreateML

// 1. Load data from a JSON file
let data = try? MLDataTable(contentsOf: URL(fileURLWithPath: "<#/path/to/read/data.json#>"))

// 2. Make a train-test split
let (trainingData, testingData) = data.randomSplit(by: 0.8, seed: 5)

// 3. Create the model
let sentimentClassifier = try? MLTextClassifier(trainingData: trainingData,
  textColumn: "text", labelColumn: "label")

// 4. Training accuracy as a percentage
let trainingAccuracy = (1.0 - sentimentClassifier.trainingMetrics.classificationError) * 100

// 5. Validation accuracy as a percentage
let validationAccuracy = (1.0 - sentimentClassifier.validationMetrics.classificationError) * 100

// 6. Evaluation accuracy as a percentage
let evaluationMetrics = sentimentClassifier.evaluation(on: testingData)
let evaluationAccuracy = (1.0 - evaluationMetrics.classificationError) * 100

// 7. Add metadata
let metadata = MLModelMetadata(author: "John Appleseed",
  shortDescription: "A model trained to classify movie review sentiment", version: "1.0")

// 8. Export for use in Core ML
try? sentimentClassifier.write(to: URL(fileURLWithPath: "<#/path/to/save/SentimentClassifier.mlmodel#>"),
    metadata: metadata)
- Step 1 loads data into a table with
textandlabelcolumns, where the value oflabelispositive,negativeorneutral. The WWDC 2018 Session 703 video shows an alternative way to load text data using separate text files in folders namedpositiveandnegative, similar to the way you load images to train an image classifier. This is a special extra in Create ML; it isn’t available in Turi Create.
Alternative way to load labeled text data, from WWDC 2018 Session 703:
let trainDirectory = URL(fileURLWithPath: “/Users/createml/Desktop/train”)
let testDirectory = URL(fileURLWithPath: “/Users/createml/Desktop/test”)
// Create Model
let classifier = try MLTextClassifier(trainingData: .labeledDirectories(at: trainDirectory))
Back to the main text classifier code:
- Step 2 does the same as Turi Create’s
random_split(), randomly allocating 20% of the data totestingData. The optionalseedparameter sets the seed for the random number generator. - Step 3 does the same as Turi Create’s
sentence_classifier.create(). - Steps 4-6 calculate training, validation and evaluation accuracy metrics.
- Steps 7 and 8 export the Core ML model with some metadata.
Turi Create
This code is from our tutorial Natural Language Processing on iOS with Turi Create . It trains a sentence classifier with poems from 10 poets, to predict the author of the test text.
import turicreate as tc

# 1. Load data from a JSON file
data = tc.SFrame.read_json('corpus.json', orient='records')

# 2. Create the model
model = tc.sentence_classifier.create(data, 'author', features=['text'])

# 3. Export for use in Core ML
model.export_coreml('Poets.mlmodel')
- Step 1: Like Create ML, you can load data from JSON or CSV files.
- Step 2 trains the model.
- Step 3 exports the Core ML model.
The Turi Create tutorial materials include an iOS app where you can test the model on text pasted into a textview. The app uses a wordCounts(text:) helper function, similar to the bag of words function at the bottom of the Turi Create text classification example .
The Turi Create text classifier expects input in the form of a dictionary of words and word counts. The Create ML text classifier accepts the text input directly, and creates its own bag of words.
Turi Create Image Similarity
Now take some deep breaths — you’re going on a Turi Create adventure!
Turi Create has five task-focused toolkits that aren’t (yet?) in Create ML:
- Recommender systems
- Image similarity
- Object detection
- Style transfer
- Activity classification
Cat and dog pictures are fun to look at, so you’ll train a model to find similar images.
And yes, you need to write some Python. The development environment that will feel the most familiar is a Jupyter notebook — it’s like an Xcode playground, but it runs in your browser.
The easiest way to get going is to use Anaconda — created by the ML community to sort out all the versions of Python and ML libraries, and manage them in separate environments .
Anaconda & Notebooks
Download the Python 3.6 version of Anaconda for macOS , and install it in your home directory , not in your root directory:

If it says you can’t install it there, click the Install on a specific disk… button, then click back to the Home button — it should be more agreeable:

Note : Installing Anaconda and creating the Turi Create environment can take several minutes. While you wait, browse Michael Kennedy’s November 2014 Comparison of Python and Swift Syntax and Jason Brownlee’s May 2016 Crash Course in Python for Machine Learning Developers . Brownlee’s article includes examples of using the data science libraries NumPy, Matplotlib and Pandas. The biggest difference between Swift and Python syntax is that you define closures, functions and classes with indentation instead of { ... } .
Create Turi Create Environment
Use either the Anaconda Navigator GUI or a Terminal command to create an environment where you can run Turi Create code.
GUI : Open Anaconda Navigator , switch to its Environments tab, and import starter/turienv.yaml — simply click the folder icon and locate the file in Finder . Anaconda Navigator will fill in the environment name from the file:

Terminal : Open Terminal and enter this command:
conda env create -f <drag starter/turienv.yaml file from Finder>
Launch Jupyter Notebook
Use either the GUI or Terminal commands to launch Jupyter notebook in the turienv environment.
First, in Finder , create a local folder named notebooks .
If you have a really new and powerful Mac, download and unarchive the Kaggle Cats and Dogs Dataset , then move the PetImages folder into notebooks , so you can easily load it into the notebook you’re about to create.
The full Kaggle dataset contains 25,000 images, which takes a long time to process on an older Mac. Feel free to use the Pets-1000 folder instead, or create your own dataset.
GUI : If you’re using Anaconda Navigator , switch to the Home tab, check that turienv appears in the Applications on field, then click jupyter Launch :

A terminal window opens to run the Jupyter server, then a browser window displays your home directory. Navigate to your notebooks folder.
Terminal : If you’re using Terminal , enter this command to load turienv :
source activate turienv
The command line prompt now starts with (turienv) . Enter this command to start the Jupyter server in the notebooks folder, and display the browser window:
jupyter notebook <drag notebooks folder from the Finder>
Training the Model
Create a new Python 3.6 notebook:

Double-click the title to rename the notebook:

Note : This example is the same as Apple’s Image similarity example, but using the Cat and Dog dataset.
The notebook contains a single empty cell. Type this line in the cell, then press Shift-Enter to run the cell:
import turicreate as tc
Note : Shift-Enter also works in Xcode playgrounds if you want to run just one code statement.
A new empty cell appeared below the first. Type the following in it, then run it:
reference_data = tc.image_analysis.load_images('./PetImages')
reference_data = reference_data.add_row_number()
reference_data.save('./kaggle-pets.sframe')
You’re loading the images into a table, adding row numbers to the table, then saving it for future use. Ignore the JPEG decode failure messages.
Note : While typing Python code, use the Tab key for autocomplete.
In the next cell, run this statement to explore the data:
reference_data.explore()
A window opens, displaying id, path and image columns. Hovering the cursor in a row shows the image:

Next, run this statement:
model = tc.image_similarity.create(reference_data)
This will take a while — In [*] shows it’s running. While you wait, read about unsupervised learning .
Note : To stop the cell before it finishes, click the Stop button (next to Run in the toolbar). Feel free to delete images from PetImages , or just load Pets-1000 instead. I went out for lunch while this ran on my early-2015 MacBook Pro, and it was finished when I returned 90 minutes later ;].
Unsupervised Learning
Providing labeled data to the image classifier enables it to measure how accurate it is by checking its predictions against the labels. This is supervised learning .
Although you supplied the same labeled dataset to this image similarity trainer, it doesn’t use the labels: this model uses unsupervised learning . The underlying model looked at a very large number of images, and taught itself which arrangements of pixel values constituted features that it could use to cluster “similar” images. So just like the image classifier, most of the training time is used for extracting these features from your dataset. Then it does “brute force” nearest neighbors model training: for each image, it computes its distance to every other image, and ranks the other images into radius bands. Again, this step is fast, compared to the feature extraction.
Querying the Model
When the model is ready, run these lines:
query_results = model.query(reference_data[0:10], k=10)
query_results.head()
You’re passing an array that contains the first 10 reference_data images, asking for 10 similar images for each, then showing the first 10 rows of query_results .
Suppose you want to find similar images for the 10th image. First, see what it is:
reference_data[9]['image'].show()

The loading order of images is non-deterministic, so your 10th image is probably something different. What matters is that it should look like the output of the next cell.
So run these lines:
similar_rows = query_results[query_results['query_label'] == 9]['reference_label']
reference_data.filter_by(similar_rows, 'id').explore()

The target image is actually the first image returned. The other images show cats that look similar and/or are positioned in a similar way.
Congratulations! You’ve just built an image similarity model in Python ! And your Mac didn’t explode ;]. Hopefully, you’ll try out other Turi Create examples on your own data.
Shutting Down
Log out of the jupyter browser windows.
In the Terminal window where the jupyter server is running, press Control-C-C to stop the server.
If your command line prompt starts with (turienv) , enter this command to exit:
source deactivate
If you really don’t want to keep Anaconda, enter this command:
rm -rf ~/anaconda3
Where To Go From Here?
The finished Turi Create notebook and iOS project are in the finished folder of this tutorial’s materials. Use the Download Materials button at the top or bottom of this tutorial.
You’re now well-equipped to experiment with datasets in Create ML, and hopefully you’ll continue learning about Turi Create.
Explore Create ML and its documentation, but also spend some time browsing the Turi Create User Guide , even if you don’t want to write Python. The Turi Create How it works documentation is impressively informative and mostly math-free. To find out even more, follow their academic reference links.
And here are some other resources and further reading to deepen your own learning:
Our Tutorials
This tutorial is just the latest in a series of ML tutorials from your favorite how-to site. And yes, there will be more!
- Core ML and Vision: Machine Learning in iOS 11 Tutorial
- Beginning Machine Learning with Keras & Core ML
- Beginning Machine Learning with scikit-learn
- IBM Watson Services for Core ML Tutorial
- Natural Language Processing on iOS with Turi Create
- Caffe (coming soon).
ML Community
- Kaggle is a repository of datasets contributed by members, often supplemented by notebooks that analyze and visualize the data. It runs model prediction competitions, which leads to the next link:
- Machine Learning Zero-to-Hero: Everything you need in order to compete on Kaggle for the first time, step-by-step!
I hope you enjoyed this Create ML tutorial. Please join the discussion below if you have any questions or comments. And especially tell us what you do with Create ML and Turi Create!
Recommend
About Joyk
Aggregate valuable and interesting links.
Joyk means Joy of geeK