

Git basics using CLI, GitKraken and SourceTree – satoripop
source link: https://blog.satoripop.com/git-basics-using-cli-gitkraken-and-sourcetree-c44f8572e39d?gi=3963060f646b
Go to the source link to view the article. You can view the picture content, updated content and better typesetting reading experience. If the link is broken, please click the button below to view the snapshot at that time.
Git basics using CLI, GitKraken and SourceTree

In a previous blog post, we drew a comparison between GitKraken and SourceTree in order to help developers choose what Git GUI client to use when dealing with Git projects. In this article, however, we will highlight the basics of Git, using those two GUI clients in addition to CLI, since everyone should know what happens behind the scenes when using their favorite GUI client.
Get a Git repository
We will start by seeing how to get a Git repository. Basically, there are two ways to do so.
The first one is by taking a local project that is still not a Git repository and turn it into a Git repository.
To do that using CLI, we need to go to our project’s directory, at first, using cd /path/to/project command and then initialize the repository using this command git init. This will create a new sub-directory called .git, which is a folder used by Git to save all necessary files to our repository, but be careful, don’t mess with it until you know what you are doing because you risk breaking things.
Now, if we run git status to see our working tree status, We will notice that :
- We are on branch master (We will see branches in a future blog post Git branching);
- There are no commits yet because we still haven’t created any commits in our new initialized repository;
- The files in our project are marked as untracked files (we will see the life-cycle of the status of Git repository files in a moment).

Initializing a Git repository using CLI
Now, let’s see how to initialize a Git repository using GitKraken and SourceTree.
In GitKraken, we need to open the Repository Management window, then click Init menu and choose the Local Only option. After that, we need to specify the path of our project, optionally we can choose a .gitignore Template (We will see what a .gitignore file is later), a License and whether to initialize the repository with LFS or not. When confirming by clicking on Create Repository button, our Git repository will get initialized. We will notice that in our project’s history view, a commit called Initial commit was automatically created by GitKraken, with only one file in it README.md. Some will find this feature useful, others won’t, I belong to the others.

Initializing a Git repository using GitKraken
In SourceTree, we just need to open Create tab, enter our project’s directory path and then click Create. This will initialize our Git repository with no automatically created commits.

Initializing a Git repository using SourceTree
The second way to get a git repository is to clone an existing Git repository from elsewhere to your local machine (We will see how to clone a repository in a future blog post Collaborate with Git).
The life-cycle of the status of Git repository files
When we initialized our Git repository we noticed that the status of our files was untracked, let’s see what that means.
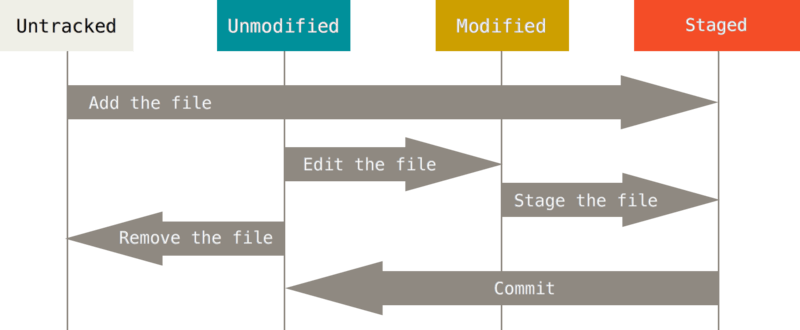
The life-cycle of the status of files in a Git repository
We can see that we have four different file statuses in a Git repository :
- Untracked, referring to files that are still not added to our project’s history;
- Unmodified, referring tofiles added to our project’s history, but still not modified;
- Modified, referring to files that have been added to our project’s history and are modified;
- Staged, referring to files or changes that will be added to our next commit and our project’s history.
Let’s see some examples to better understand theses statuses and how to switch between them.
We already have got untracked files. To make them in the staged state we need to start tracking them. This can be done using the git add . command, a command that will stage all files that are untracked and modified. Now, that the files became staged, we just need to commit them in order to add them to our project’s history and make them have the unmodified status as well. The command to do that is git commit. When executing it, an editor will launch to type your commit message. You can also type your commit message with the commit command like so git commit -m “Initial commit”.

Staging and committing using CLI
The equivalent of this in GitKraken is staging all the changes from the Commit Panel States panel, entering your message, then confirming by clicking on Commit changes

Staging and committing using GitKraken
In SourceTree, the process is the same. We need to go to File Status view, Stage our files, then type our commit message and click on Commit

Staging and committing using SourceTree
Until now, we’ve seen how to change files’ statuses from untracked to staged to unmodified. To change a file status from unmodified to modified is, obviously, by modifying it. So, to save the changes of the modified files, we need to stage them in order to make them have staged status, then commit the changes. Following that, the files will have the unmodified status, and the cycle repeats.
Now, we need to see how to move from unmodified status to untracked status. It is when we have a file that was added to our project’s history and we need to remove it from version control and probably ignore it.
To make an example of this case I added an error.log file to my project and made a commit to add it to version control. As this file is a log file it is better to be ignored by Git, but before ignoring it using .gitignore file, we need to remove it from version control first.So, we start by executing git rm --cached error.log. This command will remove the file from version control and not from the file system. Following that, we will see that this file is staged and tracked at the same time when we run git status command because we need to commit the removal of the file from version control too. After committing the changes our file will only have the status untracked. Now, that the file is untracked, we can add it to .gitignore file in order to be ignored by Git.

Untracking a file using CLI
Now, let’s see how to do this in GitKraken. Unfortunately, the file needs to be modified in order to appear in GitKraken UI. When it is modified, we right-click on it and choose to ignore it from the Commit Panel States panel, then select Ignore and Stop Tracking option. GitKraken will remove the file from version control and automatically add it to .gitignore file in order to be ignored. Now, we just need to commit the removal of the file from version control and the update that was made to our .gitignore file.

Untracking a file using GitKraken
There is a small difference when doing this in SourceTree. Thankfully, we don’t have to wait for the file to be modified, we can show all files in SourceTree and stop tracking the file we want to remove from version control. To do that, we need to go to File Status view and choose to show all files. Now, we right-click our file and choose the Stop Tracking option. At this level, the file will appear as staged and untracked like we saw in CLI. Now, we need to commit the removal of the file from version control and then right-click the untracked file and choose to ignore it. This will add the file to .gitignore file like how GitKraken did.

Untracking a file using SourceTree
In this blog post we saw the basics of using Git. At this stage, I guess, you are ready to start working with Git since we saw the majority of the commands we need in order to work with it. Our next blog post will be about how to collaborate with Git. Stay tuned!
Recommend
About Joyk
Aggregate valuable and interesting links.
Joyk means Joy of geeK